
Oh, you know those nights? The ones where you just *need* that warm, cheesy, deeply satisfying hug of Italian food, but you’re trying to keep things light? That is exactly why I developed this Baked Chicken Parmesan with Mozzarella recipe. Forget the oil splatters and heavy frying; this version hits all those classic notes while keeping cleanup simple and the guilt low. When I first moved to Brooklyn and got really into urban foraging, I remember stumbling upon some wild basil near an old community garden. I was so inspired that I whipped up this dish, using my neighborhood bounty, and wow—my kitchen smelled like I was right there in Tuscany! That day proved to me that amazing flavor doesn’t require a long drive or a complicated process. I’m Alexandra Bennet, your Urban Forager & Hyperlocal Ingredient Specialist, and I promise, this chicken parmesan recipe is about to become essential for your rotation.
If you’re looking for more inspiration on making dinners easy and informed, you absolutely must check out my guide on dinner ideas, ingredients, and essential cooking tips!
Why This Baked Chicken Parmesan with Mozzarella is Your New Weeknight Favorite
Honestly, this one is a winner because it practically cooks itself. You get all the amazing flavor payoff, but without spending an hour over a hot stove. Trust me, your weeknights just got a whole lot easier!
- It’s baked, not fried, making it a much lighter take on this classic.
- That crispy panko crust holds up beautifully, even after it’s topped with sauce.
- It delivers that gooey, cheesy comfort food vibe every time.
- Prep is quick, so you’re only about 50 minutes away from dinner!
You can find even more inspiration for super fast cooking over on my post about 5-ingredient dinner ideas that just will not fail.
Gathering Your Ingredients for Baked Chicken Parmesan with Mozzarella
Listen, to get that beautiful, crunchy exterior on our baked Italian chicken, quality matters! Since I always preach using the freshest things I can find locally, I really encourage you to grab the best chicken breasts you can find. Even though we’re baking, a great foundation is everything for this cheesy comfort food. Don’t skimp here—it really pays off when you bite into that juicy center!
For the Chicken and Seasoning
We just need two big pieces of meat to start. Make sure they’re prepped right so they cook evenly. Grab:
- 2 large boneless skinless chicken breasts (slice them thin if they are super thick!)
- Salt, just to taste
- Pepper, also to taste
The Flour Mixture
This first layer helps dry the surface so the egg sticks perfectly. It’s simple but crucial for getting that nice crust.
- 1/2 cup flour
- 1 1/2 teaspoons seasoned salt
- 1/4 teaspoon pepper
The Egg Wash
This is what binds our beautiful breading to the chicken. You want this looking a little bubbly!
- 2 eggs, beaten until frothy
- 1/2 teaspoon garlic powder
The Panko Breading Combination
This is where the real texture magic happens! We’re using panko because they are lighter than standard breadcrumbs, which keeps our baked version from getting heavy. Always use freshly grated Parmesan cheese here—it just melts better!
- 1 1/2 cups panko breadcrumbs
- 1/3 cup Parmesan cheese, freshly grated
- 1 teaspoon dried parsley
- 1 teaspoon dried oregano
Cheese and Topping for Baked Chicken Parmesan with Mozzarella
Finally, the crowning glory! If you foraged some fresh basil, chop it rough to sprinkle on at the very end—it’s so much better than dried stuff, though we use dried for the main breading blend.
- 1 cup marinara sauce
- 1 1/2 cups mozzarella cheese, shredded
- Fresh Parsley, to garnish at the end
Essential Equipment for Perfect Baked Italian Chicken
Okay, for this easy weeknight bake, we need just a couple of workhorses. You don’t need fancy gadgets, thank goodness! Grab your trusty baking sheet and a few shallow dishes for setting up stations. Pro tip: Line that baking sheet with parchment paper. Seriously, it makes cleanup a breeze after we’re done enjoying this delicious comfort food!
For more tips on keeping the mess minimal, check out my guide on one-pan methods for minimum cleanup.
Step-by-Step Instructions for Baked Chicken Parmesan with Mozzarella
Alright, let’s get this show on the road! This is the stage where all that prep work really pays off. We’re aiming for golden, crispy chicken that isn’t swimming in oil. It’s all about getting the temperature right and moving quickly through the coating process. I always find that having a little playlist on helps me focus when setting up these dredges!
If you want a foolproof guide to general dinner timing, take a peek at my tips on how to make dinner ideas foolproof. If you want another spin on this recipe, check out The Cozy Cook’s version!
Prep Work and Oven Setup
First things first, crank that oven up! You need it hot: preheat your oven to 400°F (200°C). Lightly grease your baking sheet—or better yet, line it with parchment paper like I showed you before! Next, prep the chicken. If your breasts are really thick, butterfly them or pound them down so they are about the same thickness; this is key for even cooking. Season both sides generously with your salt and pepper right now.
Creating the Three-Step Breading Process
We need those three shallow dishes ready to go. First, that flour mix, then the frothy egg and garlic powder, and finally, the panko and Parmesan blend. Take one seasoned cutlet and dust it *really* well in the flour first, giving it a good shake to ditch the extras. Then, dunk it in the egg—let the drips fall off. The final, most important step: press that cutlet firmly into the breadcrumbs. You want those crumbs nice and stuck, so press hard on both sides!
The Initial Bake and First Topping Application
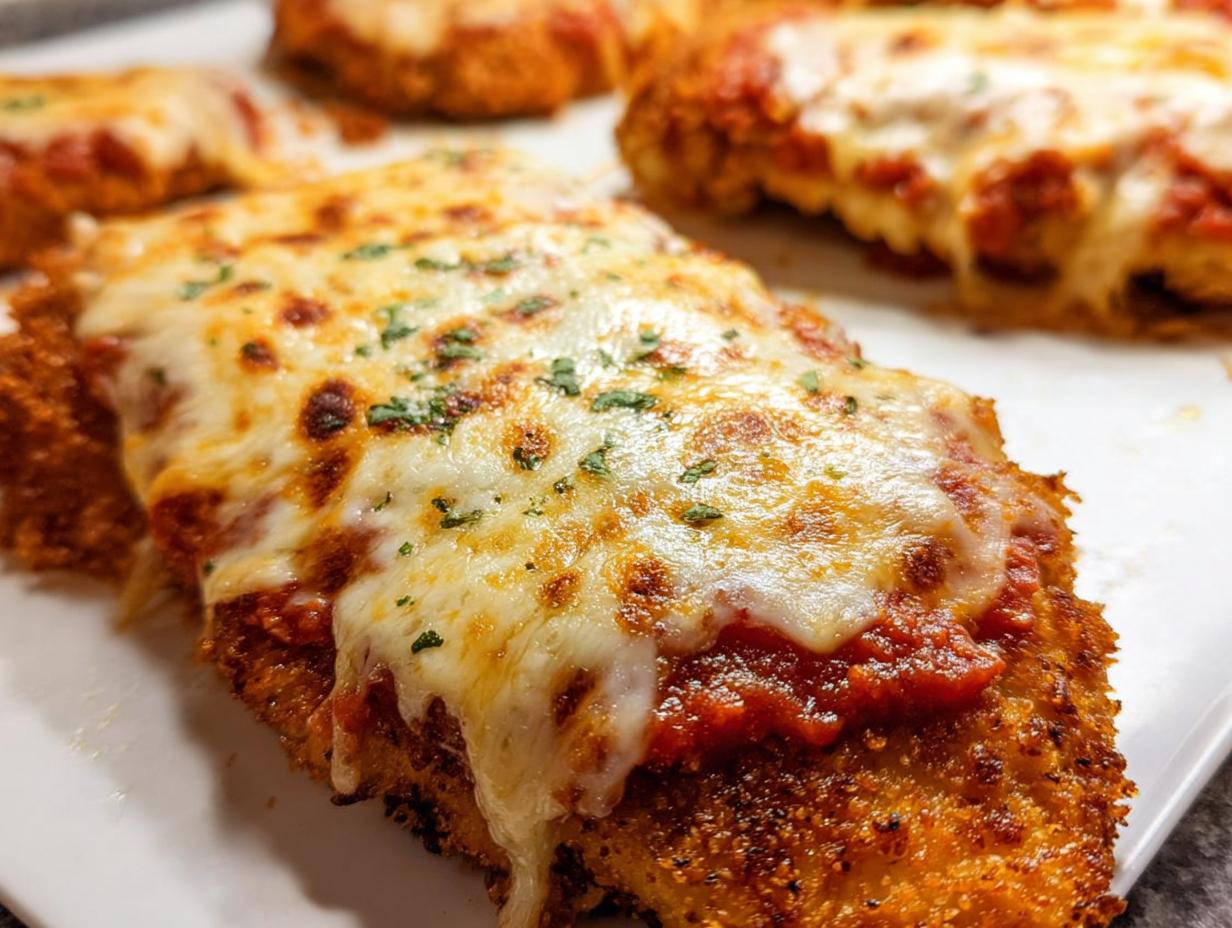
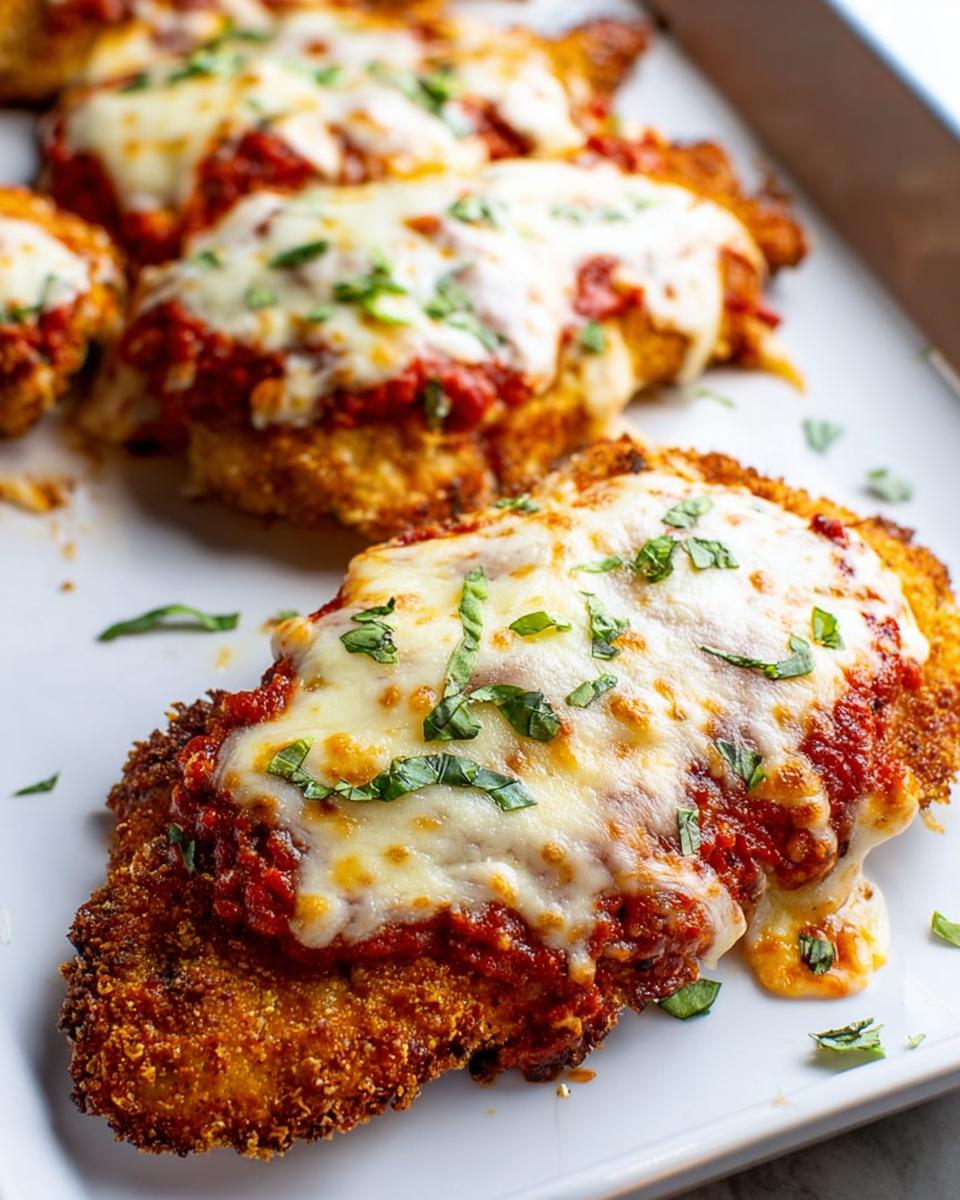
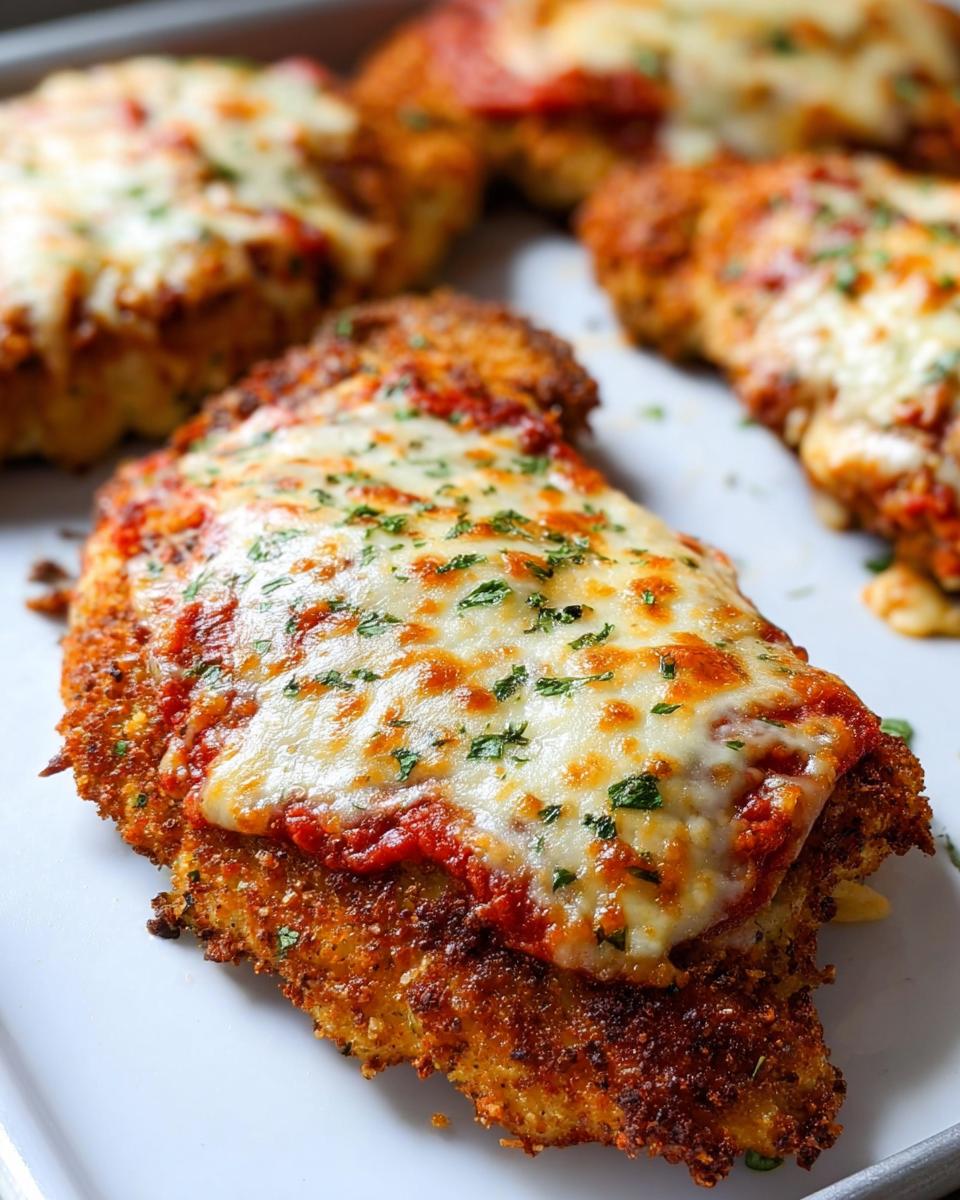
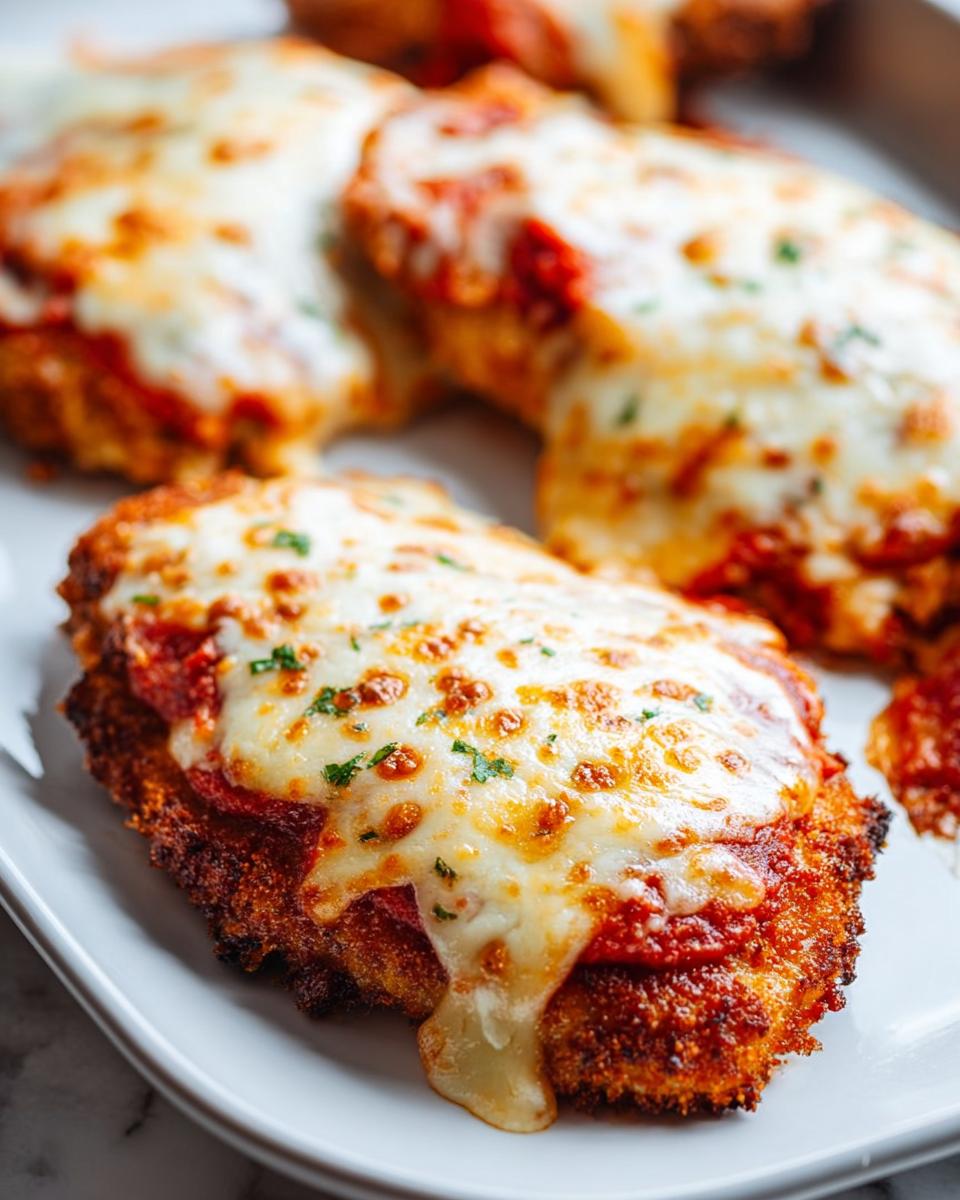
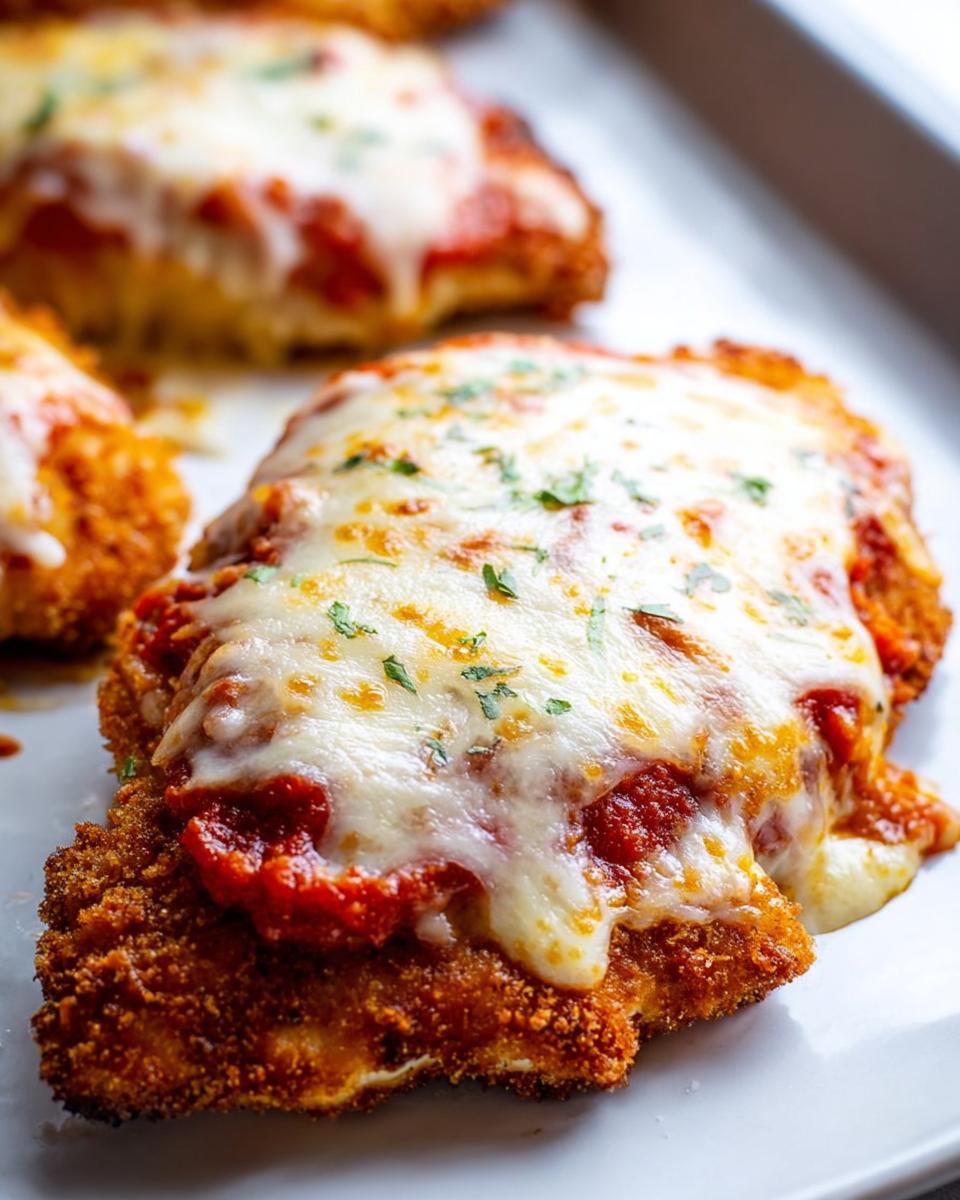
Before they hit the oven, give the breaded cutlets a light brush or drizzle with that vegetable oil. This helps them get that gorgeous baked color, don’t skip this tiny step! Place them on your prepped sheet and slide them in for 15 glorious minutes. When that timer goes off, pull them out quickly! Spoon about two dollops of your marinara sauce right over the center of each piece, and then pile on that shredded mozzarella cheese!
Final Bake and Serving the Baked Chicken Parmesan with Mozzarella
Back into the 400°F oven they go for another 10 to 15 minutes. You’re waiting for that cheese to get totally gooey and bubbly, but double-check the internal temperature—165°F (74°C) is where you want to be for safe, juicy chicken. Once they are perfect, pull them out, garnish them immediately with a sprinkle of that fresh parsley, and get ready to eat. This is going to be the best pasta night idea!
Tips for Making Your Baked Chicken Parmesan with Mozzarella Extra Cheesy Comfort Food
Okay, so you nailed the breading and got it in the oven—but how do we guarantee that perfect crispy-on-the-outside, super-juicy-on-the-inside result? It comes down to a couple of non-negotiable tricks. First, you absolutely must use panko—it’s lighter and crisps better in the oven than regular breadcrumbs, so don’t swap that out!
Second, since I love experimenting with my foraged finds, try this: mix a teaspoon of finely chopped fresh herbs—like basil or even a little wild oregano—right into your mozzarella topping just before the final bake. That burst of fresh green flavor really cuts through the richness!
And here’s a huge confidence booster: make sure those chicken cutlets are uniformly thin. If one side is thick and the other is thin, you either get dry chicken or soggy breading. Precision across the board means perfect cheesy comfort food!
For more secrets on achieving that ultimate texture, check out my post about achieving crispy outside, juicy inside when cooking dinner.
Ingredient Substitutions for This Chicken Parmesan Recipe
I get it, sometimes you’re missing one thing, or you’re trying to sneak in some low-carb options for your family. That’s totally fine! This chicken parmesan recipe is flexible, but we have to be smart about the swaps so we don’t lose that crispy texture we worked so hard for.
For instance, if you aren’t doing a lot of carbs, you might ask about the breading. You can absolutely skip the flour and panko entirely (remember my note in the nutrition section?). If you do that, make sure you season the chicken *really* well after you dip it in the egg, and maybe bake it for a couple of extra minutes before adding the sauce so the meat firms up.
When it comes to the oil for brushing, if you don’t have vegetable oil, olive oil works beautifully—it adds a little bit of that lovely Italian flavor, too! For the cheeses, if you don’t have mozzarella on hand, provolone gives a bit more bite, but it won’t melt quite as soft. Stick to low-moisture types for the best results on top!
If you’re trying to build a whole week of budget-friendly, health-conscious meals, you should really look at my guide on creating a cheap keto grocery list. It gives you great ideas beyond just this dish!
Serving Suggestions for Pasta Night Ideas
Since this Baked Chicken Parmesan with Mozzarella is so rich and cheesy, you don’t need a giant plate of pasta underneath it! For a classic pasta night idea, keep the sauce light. A simple spaghetti tossed with a little garlic, olive oil, and fresh parsley is perfect.
If you are sticking to lower carb options, spiralized zucchini or spaghetti squash cooks up fast and gives you that noodle feel without the fuss. It’s a great way to pack in a little extra green!
If you want to skip the starch altogether, just serve this beauty alongside a big, vinegary arugula salad—the peppery greens are a wonderful counterpoint to the baked Italian chicken.
For more easy dinner ideas that always involve pasta, check out my resource on dinner ideas that always get requested.
Storage and Reheating Instructions for Baked Chicken Parmesan with Mozzarella
Oh no, someone told me there might be leftovers! That’s the best kind of accident, isn’t it? Keeping this baked Italian chicken tasting fantastic the next day is all about preserving that crust. If you followed all my steps, you should have a juicy interior, which means we have to be careful not to steam it into submission when we reheat it.
For storage, you want to let the chicken cool down completely first—don’t put warm food straight into the fridge, that’s a fast track to bacterial trouble! Once cool, tuck it into an airtight container. You can generally store leftovers safely for about three to four days in the refrigerator. I only ever manage two days before I get too impatient to eat the rest!
Now for the important part: reheating! Please, I beg you, skip the microwave if you can! The microwave is the enemy of crispiness—it basically turns your beautiful panko crust into gummy sadness. You have two much better options for getting that gooey cheese and crispy edge back.
The oven is usually my go-to for a couple of pieces. Just set your oven—or toaster oven—to about 350°F (175°C). Pop the chicken right onto a wire rack set over a baking sheet. Why the wire rack? That lets air circulate underneath so the bottom doesn’t get soggy while the cheese melts again. Heat for about 10 to 12 minutes until everything is hot through.
- The Air Fryer Savior: If you have an air fryer, use it! It’s the absolute champion for reheating crispy leftovers. Set it to 375°F (190°C) for about 5 to 7 minutes. It brings back that beautiful texture like magic.
- If You Must Use the Microwave: If you’re in a real rush, microwave it, but do it in short 30-second bursts. Place a paper towel under the chicken to soak up some steam, then cover it loosely with another paper towel. It won’t be crispy, but it will be hot!
Frequently Asked Questions About Baked Chicken Parmesan with Mozzarella
It’s the end of the road, but I know you might still have a little curiosity wandering around! That’s how I feel when I’m trying a new ingredient from the garden. Here are the things I get asked most often about making this easy chicken parmesan recipe a guaranteed success at home.
Can I make this Baked Chicken Parmesan with Mozzarella ahead of time?
Yes, you totally can, and it’s a huge time-saver for busy days! I find it easiest to handle the whole breading and assembly process in advance. Once you’ve fully breaded the cutlets, lay them out on a baking sheet separated by parchment paper, cover them tightly, and chill them for up to 24 hours. When you are ready to bake, just brush them with that oil, add 5 extra minutes to the initial baking time since they are cold, and proceed with the recipe as written. You don’t want to add the sauce and cheese until that first bake is done, though!
How do I ensure my chicken stays moist when baking?
Moisture retention in any baked Italian chicken dish comes down to two easy things we covered! First, we talked about pounding or slicing the chicken breasts so they are uniform in thickness—if one part is thin, it will dry out while you wait for the thick part to cook. Second, don’t be stingy with the oil drizzle! That light coating of oil on the panko breading acts as a shield, helping the crust crisp up while it seals in all the natural juices inside that tender chicken.
Is this chicken parmesan recipe suitable for low-carb diets?
This is a great question, especially since I love exploring healthier options! Yes, it absolutely can work for low-carb lifestyles, but you need to make one specific adjustment, which I mentioned briefly in my full notes. If you are strictly avoiding carbs, you need to skip the flour and the panko breadcrumbs entirely. Instead, just salt, pepper, and season your chicken really well. After dipping in the egg wash, go straight to the baking sheet—you can even brush on a little olive oil. It won’t have the crunch, of course, but it keeps that delicious cheesy sauce and tender meat totally compliant!
If you have any burning questions that I didn’t cover here, please feel free to reach out via my contact page, and I’ll do my best to help you out!
Estimating Nutritional Data for This Baked Italian Chicken
Now, I know some of you health-conscious cooks out there are just as obsessed with the numbers as you are with the flavor—I totally get it! Especially when we’re talking about keeping things lighter than traditional fried versions. Based on the measurements listed in this Baked Chicken Parmesan with Mozzarella recipe, here’s what we are looking at per serving (remember, this recipe makes 2 servings).
It’s amazing how much protein you get in this dish! And since we baked it, the fat is much more manageable than if we fried it completely. Keep in mind, though, that these numbers are just my best estimates from the core ingredients!
- Calories: 450
- Protein: 45g
- Fat: 18g (Saturated Fat: 7g)
- Carbohydrates: 25g
- Sodium: 850mg
- Fiber: 2g
Here’s the honest truth, though: the exact amounts of salt, cheese, and maybe even the exact cut of chicken you use can change things. If you’re like me and you tend to be a little heavy-handed with that freshly grated Parmesan, your sodium and fat will go up. This is just a baseline to help keep you informed! If you want to dive deeper into how small swaps can affect your goals, you should check out my journey on keto mistakes that made me gain weight—we talk all about tracking variables there!
Share Your Baked Chicken Parmesan with Mozzarella Experience
Well, that’s it! We’ve gone from raw chicken breast to the most satisfying, cheesy comfort food you can have on a Tuesday night. I truly hope you give this Baked Chicken Parmesan with Mozzarella a try soon. I put so much heart—and a little bit of urban wild inspiration—into making sure this recipe delivers that amazing Italian flavor without needing hours of work.
Seriously, I want to know what you think! Did you try using fresh foraged herbs in the topping like I did? Did you pair it with your favorite pasta or go low-carb with roasted veggies? Don’t be shy! Rate the recipe down below and leave a little comment telling me about your experience. It helps me know what you all love to see more of on the blog!
If you want to read more about my philosophy on cooking with hyper-local and seasonal ingredients, you can check out my full story over on the About Me page. Happy cooking, friends!

Baked Chicken Parmesan with Mozzarella
Ingredients
Equipment
Method
- Preheat your oven to 400°F (200°C). Lightly grease a baking sheet or line it with parchment paper.
- Prepare the chicken. If the breasts are thick, slice them in half horizontally to create thinner cutlets. Season both sides of the chicken with salt and pepper.
- Set up your dredging stations. In the first shallow dish, mix the flour, seasoned salt, and pepper. In the second dish, whisk the eggs with the garlic powder. In the third dish, combine the panko breadcrumbs, grated Parmesan cheese, dried parsley, and dried oregano.
- Dredge each chicken cutlet first in the flour mixture, shaking off any excess. Next, dip it into the egg mixture, allowing excess to drip off. Finally, press the cutlet firmly into the breadcrumb mixture to coat both sides completely.
- Lightly brush or drizzle the breaded cutlets with vegetable oil. Place them on the prepared baking sheet.
- Bake the chicken for 15 minutes. Remove the sheet from the oven, spoon about 2 tablespoons of marinara sauce over the top of each cutlet, and cover with shredded mozzarella cheese.
- Return the chicken to the oven and bake for another 10 to 15 minutes, or until the cheese is melted and bubbly and the chicken is cooked through (internal temperature reaches 165°F or 74°C).
- Garnish with fresh parsley before serving. This chicken pairs well with your favorite pasta or a simple side salad.
Nutrition
Notes
Tried this recipe?
Let us know how it was!
Urban Forager & Hyperlocal Ingredient Specialist
My Brooklyn apartment balcony tells my story: vertical gardens packed with wild edibles, fermentation crocks bubbling with city-foraged greens, and the constant hum of dehydrators preserving herbs I’ve collected from unexpected urban corners. What started as weekend escapes to my aunt’s upstate farm during my Columbia botany studies turned into something bigger after I earned my Urban Ecology Master’s from The New School.
Instead of following traditional academic paths, I discovered that cities are actually amazing edible ecosystems—rooftop weeds, park-edge wild greens, vacant lot treasures that perfectly complement keto eating. Who knew that some of the best low-carb foods were growing right under our noses in Manhattan?
My recipe collections celebrate city seasons: spring dandelions and plantains, summer purslane from rooftops, autumn rose hips from community gardens, winter wild onions and cress. I’m certified through the New York Mycological Society and trained by Brooklyn Botanic Garden to forage safely and ethically. Over 180 of my recipes feature at least one urban-foraged ingredient—from sidewalk plantains to sumac berries and wild mint thriving in vacant lots.
My “Metropolitan Wild” column went viral after my dandelion coffee substitute hit social media. Now my weekend “Urban Wild Walks” through Central Park and Prospect Park sell out faster than I can schedule them. I teach city dwellers to spot safe, keto-friendly wild foods hiding in plain sight.
Currently, I’m partnering with local chefs to bring urban foraged elements to restaurant menus and developing an app that maps safe foraging spots across all five boroughs. Evenings find me tending my sourdough starters, pressing flowers for natural dyes, or weaving baskets from willow branches I collect during park maintenance.
Cities are wild food sanctuaries hiding in plain sight—keto eating becomes urban rebellion when you realize how much free, perfect nutrition grows right under our feet.