
Hosting a party always feels like walking a tightrope, doesn’t it? You want that spectacular, awe-inspiring finale, but timing is everything, and the last thing you need is to be frantically mixing egg whites while everyone is waiting for the main course. That panic is exactly what led me to this brilliant recipe for Chocolate Mousse (Make-Ahead Dessert). The first time I served it, I was under immense pressure hosting a dinner party, trying out new culinary experiments.
To my surprise, I discovered a make-ahead method that not only saved my evening but actually *enhanced* the mousse’s deep, luxurious flavors overnight in the fridge. Seeing the delight on my guests’ faces confirmed that dessert could be both wonderfully simple and impressively elegant. As a Precision Keto Scientist, I love finding that sweet spot where culinary art meets exact results. Trust me, this mousse is that sweet spot, offering richness without the last-minute fuss.
Why This Chocolate Mousse (Make-Ahead Dessert) Simplifies Entertaining
Let’s face it, stress-free hosting is the real magic ingredient. This recipe lets you get ahead so you can actually enjoy your own party! It’s designed to be an Elegant Dessert that looks like you spent all day on it, but you didn’t have to.
Here’s why you’ll love pulling this out of the fridge for your guests:
- Velvet Texture: The precise folding technique ensures a lofty, airy mouthfeel every time.
- Flavor Boost: Making it ahead allows the bittersweet chocolate notes to deepen beautifully.
- Crowd Friendly: Serve it in individual glasses—perfect for an NYE Dessert or any gathering!
You can find loads of other handy tips for your next get-together over on my main recipe hub here: check out more simple recipes.
Essential Ingredients for Perfect Chocolate Mousse (Make-Ahead Dessert)
Okay, so if you want that perfect, melt-in-your-mouth texture, you have to respect the ingredients. This isn’t the time for substitutes, believe me! We need quality components, especially since we aren’t baking this—it’s all about structure.
For the mousse itself, start with three eggs, but you must separate them while they are cold—it makes getting those clean yolks and whites way easier, even if we let them come to room temperature later. The chocolate has to be dark cooking chocolate, 70% cocoa minimum, paired with just a touch of unsalted butter to keep it glossy.
The critical part for aeration? You absolutely need full-fat cream that is specifically able to be whipped stiff. Sugar is caster sugar for the finest dissolve. Keep these precise measurements in mind, and you’re halfway to success!
The Science of Folding: How to Prepare Your Chocolate Mousse (Make-Ahead Dessert)
This stage is where we go from ingredients to the unbelievable lightness you want in a proper mousse. It’s all about careful incorporation—we are adding air, not beating it out! You’ll need your electric mixer for a couple of parts, but the folding needs your focused attention and a rubber spatula.
If you mess up the folding, you’ll end up with delicious chocolate pudding instead of mousse, so pay close attention here. Don’t forget, once it’s mixed, it needs a long chill time—at least six hours, but ideally overnight, which is why this recipe is such a fantastic make-ahead dessert.
Preparing the Base Components
First things first: separate those eggs. Do this while the eggs are cold because the whites separate cleaner—you can let them sit out a bit later. Whisk those yolks until they look nice and uniformly pale. Now for the chocolate: break up the good dark chocolate and let it melt slowly with the butter. Microwave is fine, just do those 30-second zaps and stir often until it’s completely smooth. Let that cool down just a touch!
Whip your full-fat cream until you get stiff peaks—don’t go too far, or it gets grainy! Then, beat those egg whites with the caster sugar until they hold firm peaks, too. A key precision point: check that lovely melted chocolate—it needs to be warm but not hot, between 35 and 40 Celsius, or it will shock the aeration out of everything else.
Achieving the Signature Airiness in Chocolate Mousse (Make-Ahead Dessert)
This might look complicated, but it’s rhythmic. First, gently fold the yolks into the whipped cream using a gentle figure-eight motion with your spatula. Remember what I said: aim for maybe eight folds maximum! Some streaks of yolk are totally fine.
Now, we temper the base. Take about a quarter of those stiff egg whites and fold them vigorously into the chocolate-cream mixture. This step lightens the actual chocolate base so it marries better with the rest of the whites later. After that, slowly pour that lightened chocolate base into the remaining egg whites. You must fold this last bit together with extreme gentleness. I count my folds—aim for a maximum of twelve! When you see no big white patches, stop mixing. You want that beautiful, airy structure for your Chocolate Mousse (Make-Ahead Dessert).

Divide it right away into your little serving glasses. You can see lots of great technique examples in general on my general recipe methods page, but this folding is the most important step!
Expert Tips for a Flawless Chocolate Mousse (Make-Ahead Dessert)
Even though this is a simple recipe, the tiny details truly separate a good mousse from a revolutionary one. My background teaches me that precision matters, especially when relying on air to hold structure. You must make sure your three eggs, once separated, are resting at room temperature before you start whipping those whites.
And please, only use full-fat cream that explicitly says it’s suitable for whipping! If the fat content is too low, you won’t get those stiff peaks needed for body. I always tell folks the best secret: while it’s a great make-ahead option, the flavor absolutely deepens if you let it set overnight in the fridge. It gets richer and more complex!
If you want to read more about my methods and why I obsess over these little steps, you can check out my philosophy on precision cooking right here on the site.
Making It Ahead: Setting Your Chocolate Mousse (Make-Ahead Dessert)
This is where the planning pays off, truly! The whole point of using this recipe as a Make Ahead Dessert is to eliminate last-minute stress. Once you’ve done all that careful folding, your mousse structure is delicate, relying on those tiny air pockets we worked so hard to create.
You need patience now—no peaking! Divide that beautiful mixture evenly into your four little glasses or pots. They need time to set up properly so they don’t weep or deflate when you finally go to serve them.
The absolute minimum refrigeration time you should allow is six hours. Seriously, set a timer! But if you want that truly deep, complex bittersweet flavor that screams ‘effortlessly elegant,’ stick it in the fridge overnight. Chilling for 12 hours lets the fats firm up around the air bubbles, which locks the height in place and melds the chocolate notes together perfectly. When it comes out tomorrow, it will be firm, luscious, and completely ready for company!
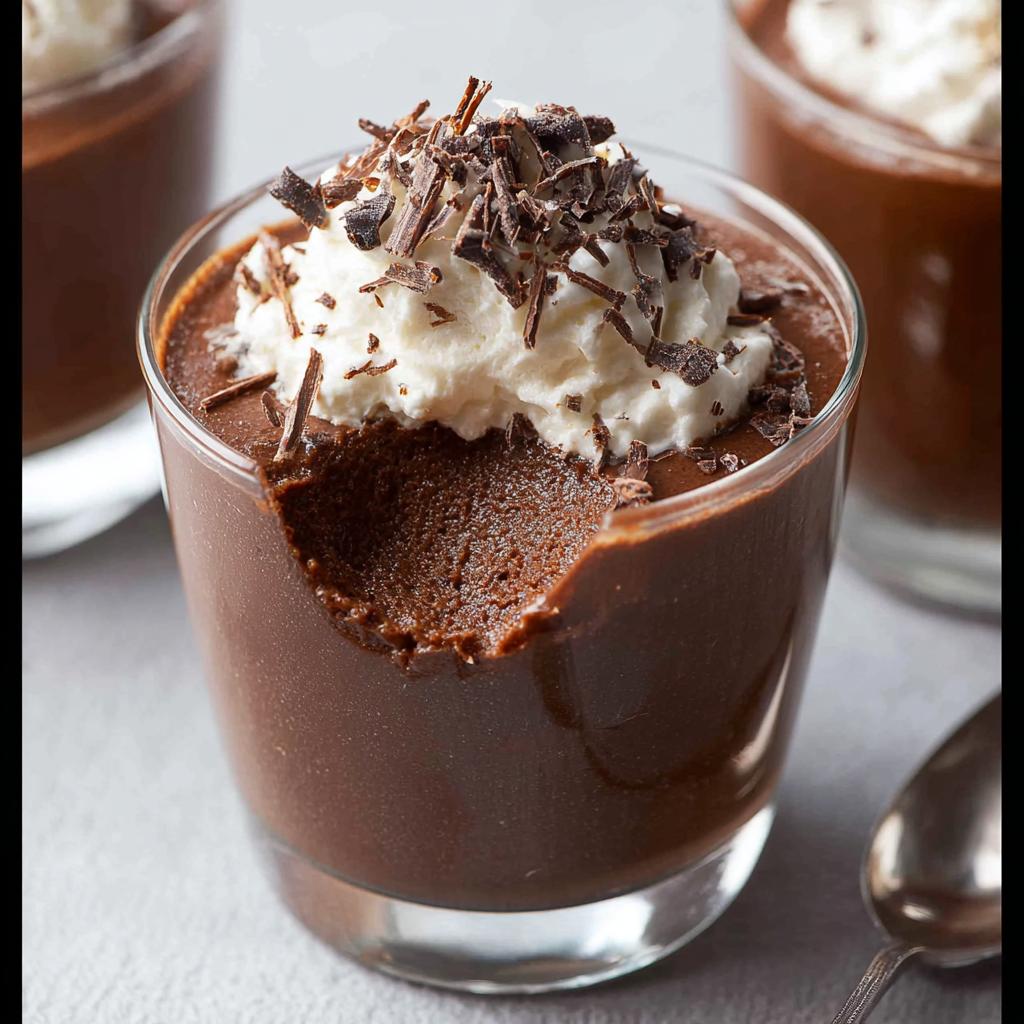
Serving Suggestions for This Elegant Dessert
All that careful making-ahead finally pays off when it’s time to present these glorious little pots of chocolate heaven! We’re aiming for simple sophistication here, nothing too fussy, but we want that ‘wow’ factor when the guests see them.
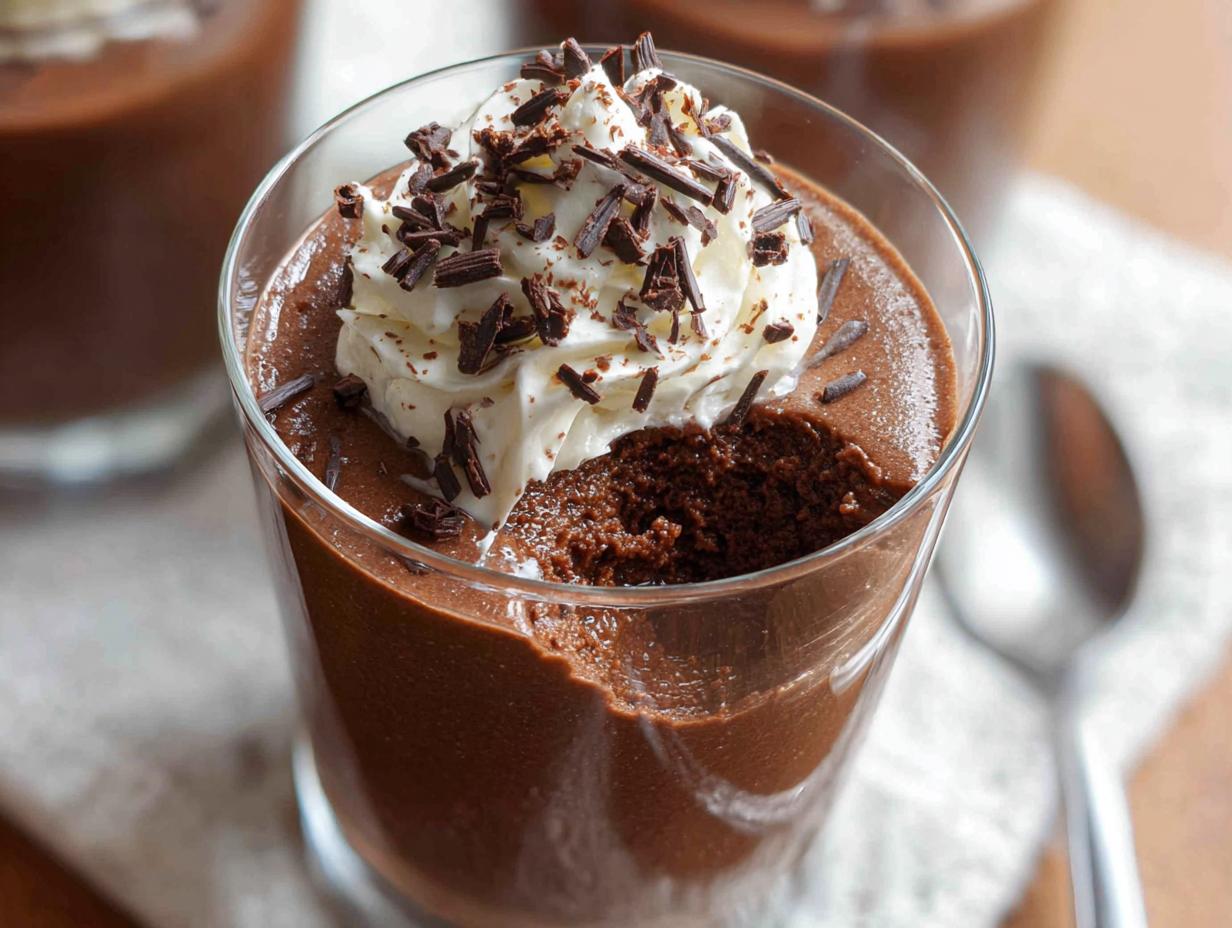
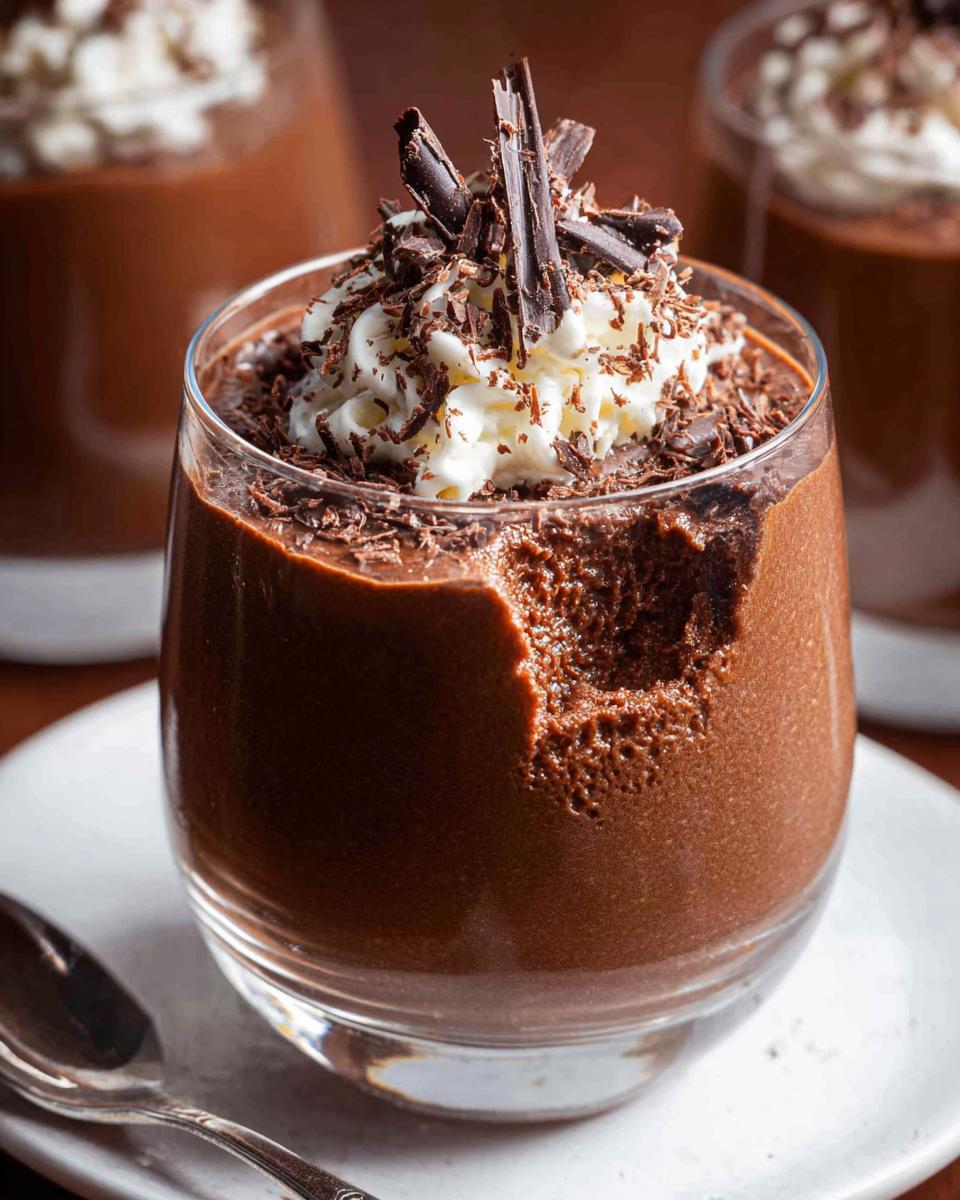
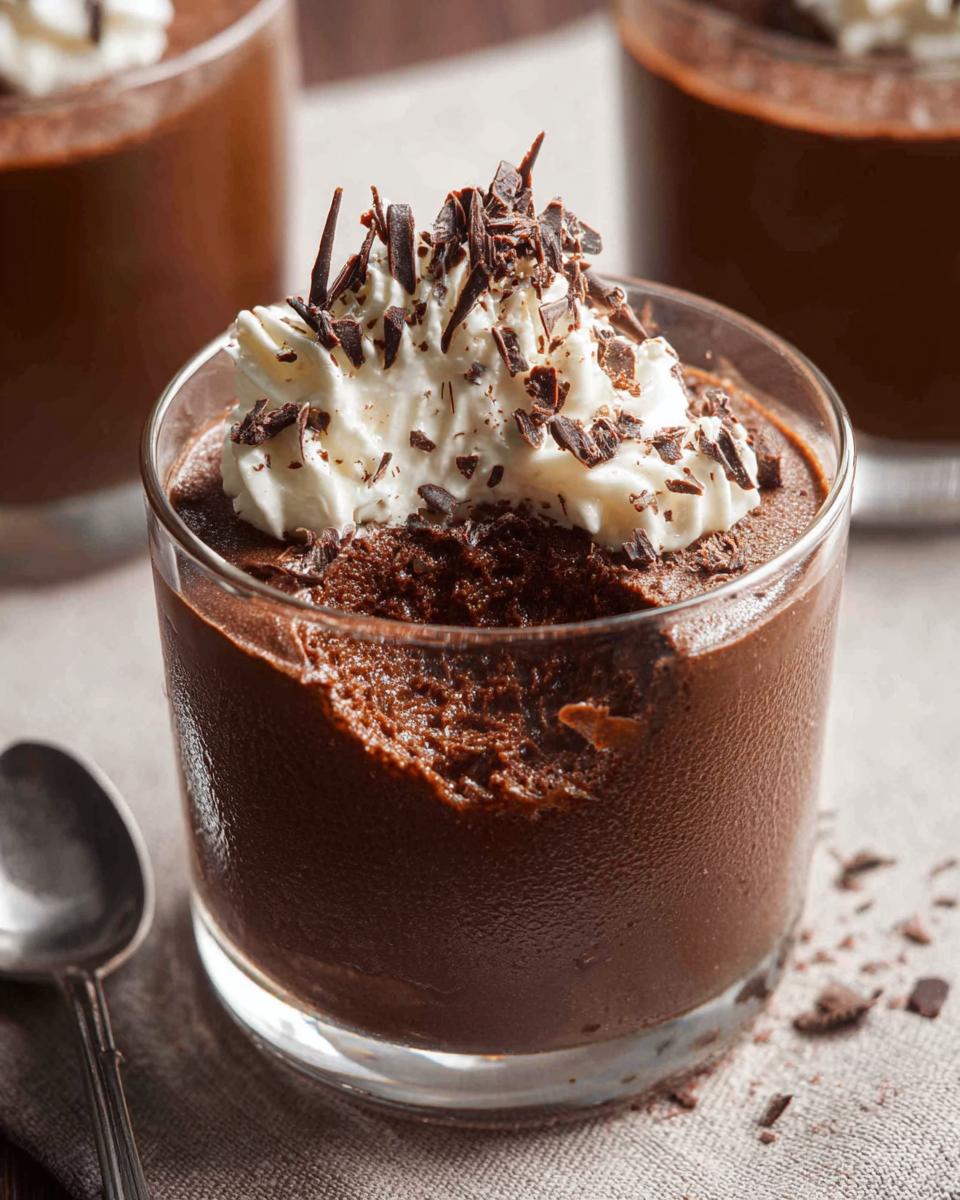
The recipe already calls for two fantastic crowning elements. First, you’ll need some extra whipped cream—don’t be shy! Dollop a cloud right on top of the chilled mousse. Then, take your best dark chocolate and create some delicate shavings. You can use a vegetable peeler on a cold bar of chocolate for this, or even a fine grater; the contrast between the white cream and dark chocolate shavings looks stunning.
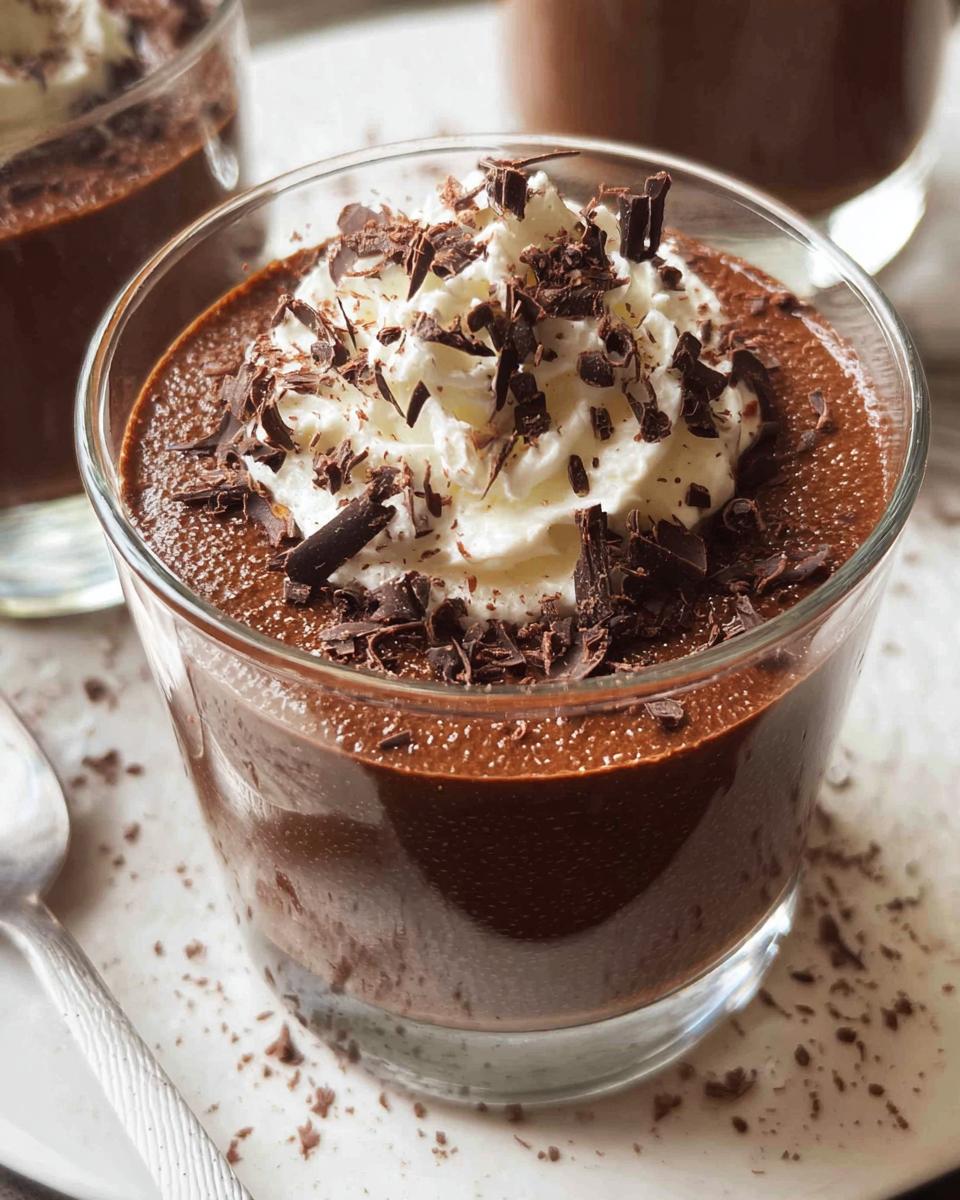
If you are feeling extra cheerful, especially if you are preparing this for a bigger crowd, I always sneak in a little pop of color. A few fresh raspberries or perhaps some perfectly ripe sliced strawberries next to the cream look incredible and cut through the richness just slightly. It’s amazing how much better dessert smells and tastes when it looks vibrant!
If you’re looking for great ways to plan your entire party menu around simple, elegant dishes like this, you should definitely check out some ideas over at my section on simple, balanced suppers. It’s all about making entertaining feel easy!
Variations on the Classic Chocolate Mousse (Make-Ahead Dessert)
Now, while I stand by the 70% bittersweet chocolate standard, I know people like to experiment, especially when a recipe is this reliable! The beauty of this Chocolate Mousse (Make-Ahead Dessert) is that the structure is so sound, thanks to that clean folding technique, that it can handle a little extra flavor infusion.
Since we are making this ahead, adding liquid flavorings near the beginning is actually perfect because it has time to integrate! Try melting in a splash of dark rum or maybe some Grand Marnier right along with your butter and chocolate. It adds such a sophisticated little warming note that nobody can quite figure out, which is always fun when people ask what your secret is.
If you prefer something slightly sweeter or less intense, you absolutely can swap out some of that bittersweet percentage for semi-sweet, but don’t go much lower than 60%, or the base can get too soft. For those who love nutty flavors, I’ve successfully folded in a teaspoon of pure almond extract right when I add the yolks to the cream—it’s divine!
If you’re exploring other wonderful sweet options that you can prepare in advance, you should definitely browse through all my keto dessert recipes. They all share that same philosophy: maximum flavor, minimum day-of drama!
Frequently Asked Questions About Your Chocolate Mousse (Make-Ahead Dessert)
I get so many questions when people try this recipe for the first time, especially since we are dealing with delicate egg whites! Don’t worry if you have a few sticking points—that’s normal when you’re playing with aeration. We scientists love documenting the ‘why’ behind everything!
Why did my Chocolate Mousse (Make-Ahead Dessert) deflate slightly?
This is the most common worry, and honestly, a tiny bit of deflation is totally expected and natural, especially if you’ve let it chill for a full 24 hours. Remember, the height comes from the air trapped in those beaten egg whites. Over time, that air tries to escape, so the edges might sink a millimeter or two. The key to minimizing this is what we talked about: fold minimally! If you overmix those egg whites into the chocolate base, you knock all the air cushion out right at the start. So, stop folding when you *think* it’s done, and then fold twice more—that’s the sweet spot.
Can I use milk chocolate instead of bittersweet?
You absolutely *can*, but you’ll change the overall profile, and it changes the structural integrity a bit. Milk chocolate has much more sugar and lower cocoa solids. If you use it, expect a significantly sweeter mousse that might be a little softer because there’s less solid ‘stuff’ to hold those air pockets. For the richest experience, stick to 70% or higher. If you really love milk chocolate, try substituting just a quarter of the bittersweet with milk chocolate, but no more than that!
How long does this Make Ahead Dessert last in the fridge?
Because this Make Ahead Dessert relies on fresh eggs, it TASTES best when served within 48 hours of making it. It will keep safely for up to a week if it’s covered well and kept very cold, but after that second day, you’ll notice the texture starts to get a little denser—it loses that fantastic airy quality we worked so hard for. Don’t try to warm it up; mousse needs to stay chilled to hold that incredible structure!
Is this a suitable NYE Dessert option?
Oh, my gosh, yes! It’s fantastic for New Year’s Eve or any big party where you cannot be fiddling in the kitchen. It’s elegant enough for champagne toasts, and since you pull it straight from the fridge, you’re free to manage appetizers or drinks right up until serving time. It’s the definition of a crowd-friendly elegance that pays off big time at midnight!
If you have any other pressing technical questions about ingredient ratios or timing, feel free to reach out on my contact page—I love finding the exact answers!
Storage and Reheating Instructions for Your Make Ahead Dessert
Since this recipe is designed specifically to be a marvelous make ahead dessert, knowing how to store it properly is almost as important as the folding technique we mastered earlier! The structure is so delicate, involving all that lovely incorporated air, that we have to treat it kindly when we put it away.
When you finish portioning the mousse into your individual glasses or small pots (after the initial chill time, of course!), you need to cover them up tight. I use little sheets of plastic wrap pressed lightly right onto the surface of the mousse for the first layer of wrapping. This stops any little condensation drips from spoiling the top, and seals out any lingering fridge smells. Then, I usually place those wrapped glasses inside a larger container just to be extra safe.
Now, for the timeline: the flavor honestly tastes the absolute best if you serve it within 48 hours. That’s when the chocolate flavor has reached its peak complexity without starting to affect the texture too much. Can you keep it longer? Yes, you probably can get away with up to a week if it’s sealed, but it will definitely start to settle and look a little less grand after day three.
And here’s the critical note—this isn’t a casserole, so please don’t try to reheat it! Heating mousse means melting the structure entirely. This dessert is strictly meant to be served perfectly chilled. If you want to serve it slightly less cold, just pull those glasses out of the fridge about 15 minutes before your guests arrive. That slight tempering just brightens the chocolate flavor perfectly.
If you’re planning a whole menu around balance and control, taking a peek at my calorie-smart recipes might give you some great pairing ideas for your sophisticated dinner!
Chocolate Mousse (Make-Ahead Dessert)
Ingredients
Equipment
Method
- Separate eggs while cold. Place whites in a large bowl and yolks in a small bowl. Set whites aside.
- Whisk the egg yolks until uniform in color and consistency.
- Break the dark chocolate into pieces and place in a microwave-proof bowl with the butter. Melt in the microwave in 30-second intervals, stirring between each, until smooth. Set aside to cool slightly.
- Beat the cream until stiff peaks form. Be careful not to over-whip.
- Add the sugar to the egg whites. Beat the egg whites until firm peaks form.
- Gently fold the egg yolks into the whipped cream using a rubber spatula. Use a maximum of 8 folds; some streaks are acceptable.
- Check the temperature of the melted chocolate. It should be runny but warm (between 35C/95F and 40C/104F). If it’s too cool or thick, microwave in 5-second bursts until runny.
- Pour the slightly cooled chocolate into the cream and yolk mixture. Fold gently until just combined, using a maximum of 8 folds. Some streaks are okay.
- Add about one-quarter of the beaten egg whites into the chocolate mixture. Fold them in using a “smear” motion across the surface to incorporate, aiming for about 10 folds until the white lumps are blended.
- Pour the chocolate mixture into the remaining egg whites. Fold gently until incorporated and no obvious white patches remain, aiming for a maximum of 12 folds.
- Divide the mousse mixture evenly between 4 small glasses or pots.
- Refrigerate for at least 6 hours, or preferably overnight, to set.
- To serve, garnish each portion with additional whipped cream and chocolate shavings. You can also add raspberries and a small sprig of mint for color.
Nutrition
Notes
Tried this recipe?
Let us know how it was!
Precision Keto Scientist
Numbers don’t lie, and neither do my recipes. I’m a biochemist who fell into keto cooking through my own metabolic research—and I approach recipe development like a lab experiment, complete with macro calculations precise to the tenth of a gram.
My journey started in diabetes research labs at Johns Hopkins, where I spent six years studying how different macronutrient ratios affected insulin sensitivity. Personal experimentation with therapeutic ketosis for cognitive enhancement led me down a rabbit hole of recipe testing that eventually consumed more hours than my actual day job.
While other cookbook authors describe flavors and textures, I quantify ketone elevation curves and glycemic impact data. My recipe database contains 340+ formulations, each tagged with detailed nutritional analysis, predicted ketosis timing, and optimal meal spacing. I measure salt by weight, time cooking processes to the minute, and log ingredient sourcing obsessively for consistent results.
My breakthrough research on fat-protein ratios for sustained ketosis got published in the Journal of Nutritional Biochemistry. My “Macro Math Mastery” workshops have trained over 5,000 people in precision meal planning. I even collaborated with continuous glucose monitor manufacturers to create the first real-time feedback system for recipe optimization.
I left my pharmaceutical research position at Merck three years ago to focus on metabolic nutrition consulting. Now I work with professional athletes, biohackers, and medical professionals seeking therapeutic ketosis protocols. When I’m not in my lab-kitchen, I’m competing in chess tournaments or documenting my daily biomarker measurements with true data scientist obsessiveness.
Cooking is just applied chemistry—and chemistry follows predictable rules. Master the variables, control the outcomes.