
You know that frantic feeling on Thanksgiving morning? The kitchen is already a mess, and you’ve got five more dishes to figure out before the guests arrive. I totally get it! One year, buried under a mountain of prep work, I remembered my grandmother’s words about keeping holidays simple and all about the people. That’s when the idea for my One-Pan Thanksgiving Green Beans (Minimal Cleanup) recipe was born! It was a game-changer for our family, letting us spend more time laughing and less time scrubbing. This dish proves you don’t need a dozen pots and pans to make something absolutely delicious. Trust me, your Thanksgiving sanity will thank you!
Why You’ll Love This One-Pan Thanksgiving Green Beans (Minimal Cleanup) Recipe
Honestly, who needs more dishes to wash on Thanksgiving? Not me! This recipe is a lifesaver for busy home cooks like us. Here’s why it’ll become your go-to:
- Seriously Minimal Cleanup: We’re talking one skillet and one baking dish. That’s it! More time for turkey, less time for scrubbing.
- Quick to Whip Up: The prep is super fast, and the baking time is efficient. You can get this on the table without breaking a sweat.
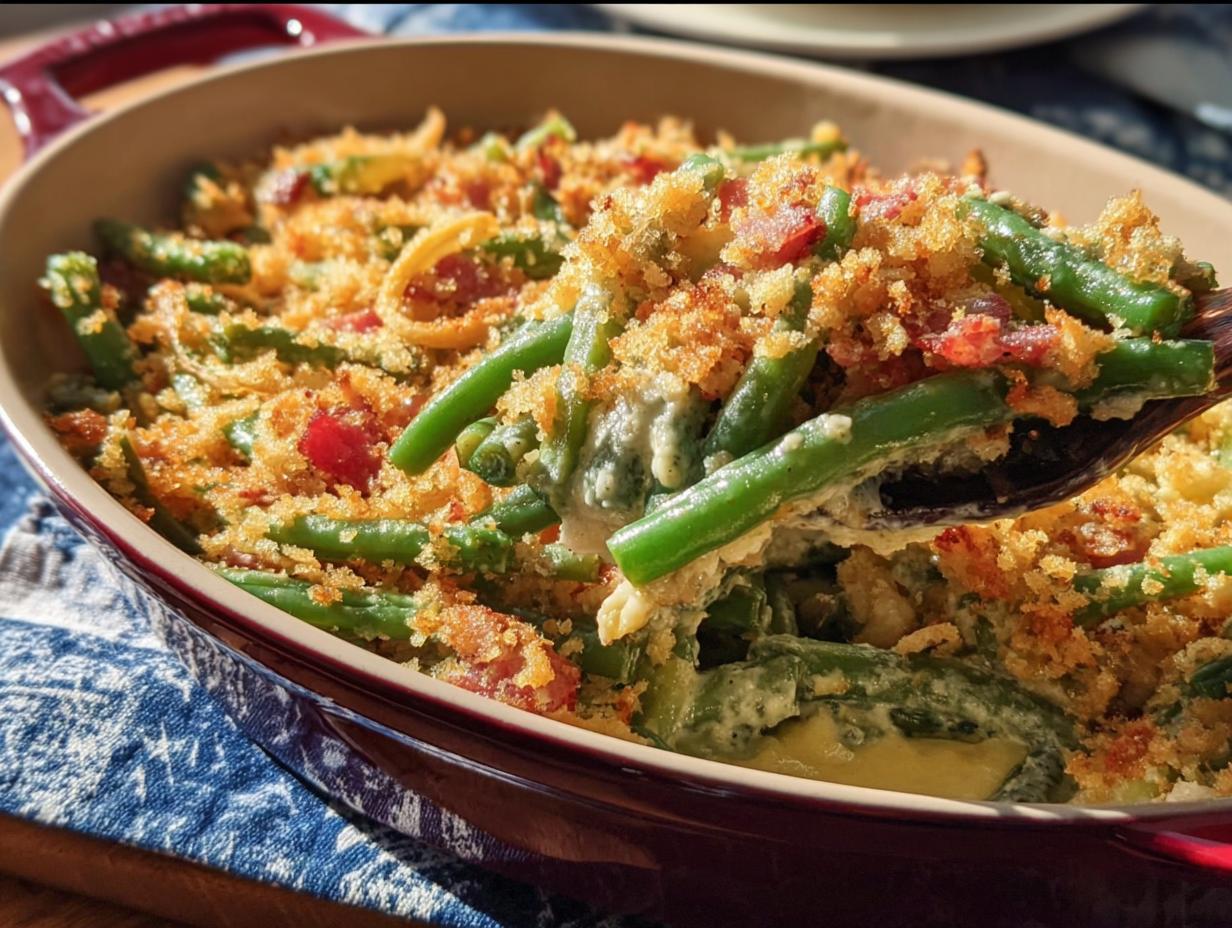
- Packed with Flavor: Forget bland, mushy green beans. We’ve got bacon, savory onions, garlic, melty cheddar cheese, and a hint of spice – it’s a flavor explosion!
- Crowd-Pleaser Guaranteed: Even the pickiest eaters in my family gobble these up. It has all the comforting flavors of a classic green bean casserole but way easier.
- Perfectly Tender-Crisp: The blanching step ensures the beans are cooked through but still have a lovely bite to them. No soggy veggies here!
- Make-Ahead Magic: You can totally prep parts of this ahead of time, which is a holiday miracle, right? We’ll get to that later!
Gather Your Ingredients for One-Pan Thanksgiving Green Beans
Alright, let’s get everything you need on the counter! This recipe is pretty straightforward, but using good ‘ol fresh ingredients makes all the difference. It’s inspired by classic flavors, but we’re making it super simple! Having all these ready to go is half the battle won, right? It reminds me a bit of how my Grandma would lay everything out before she even started mixing. It just makes the whole process flow so much smoother, especially when you’re juggling lots of things for Thanksgiving.
For the Green Beans:
- 2 lbs. fresh green beans, ends trimmed (and cut in half if you like them shorter!)
For the Sauce:
- 4 slices bacon, chopped into little bits
- 1/2 large onion, chopped up nice and fine
- 3 cloves garlic, minced (don’t be shy!)
- 4 Tbsp. butter
- 4 Tbsp. all-purpose flour
- 2 1/2 cups whole milk
- 1/2 cup half-and-half (for extra creaminess!)
- 1 1/2 tsp. salt, plus more to taste
- A pinch of freshly ground black pepper
- 1/8 tsp. cayenne pepper (just a tiny bit for warmth, you won’t even notice it’s there, but it wakes up all the other flavors!)
- 1 cup grated sharp cheddar cheese (use the good stuff!)
- 1 (4 oz.) jar sliced pimientos, drained (these add a lovely little sweetness and color!)
- Chicken broth, if needed for thinning
For the Topping:
- 1 cup panko breadcrumbs (for that perfect crunch!)
If you’re a fan of classic green bean casserole, you’ll recognize these flavors, but trust me, this one-pan method is a dream. You can always find amazing green bean recipes over at The Pioneer Woman’s site too, but this is our go-to for ease!
Simple Steps for Your One-Pan Thanksgiving Green Beans
Alright, let’s get cooking! This is where the magic happens, and trust me, it’s way easier than you’d think. We’re basically doing everything in just a couple of pans, keeping that dreaded sink full of dishes to a minimum. My grandmother always said that cooking should be about joy, not drudgery, and this recipe totally lives up to that!
Blanching the Fresh Green Beans
First things first, we need to get these lovely green beans ready. Drop ’em into some lightly salted boiling water for just 3 to 4 minutes. You want them bright green and slightly tender, not mushy! Right after, do yourself a favor and plunge them into an ice bath – it’s like a spa day for beans! This important step stops the cooking and keeps them perfectly crisp-tender for later. Drain them really well. You can find loads of great basic recipes, but I love to visit my own recipe collection for inspiration!
Preparing the Flavorful Bacon and Onion Base
Now, grab a skillet. We’re talking medium heat here. Add your chopped bacon and let it cook for a couple of minutes. We want it to still be a little soft, not crispy like chips, because it’ll cook more later. Then, toss in your chopped onions and minced garlic. Cook them together for about 3 to 5 minutes until the onions are nice and golden. Scoop this deliciousness out of the pan and set it aside for a bit. That little bit of bacon fat left behind? It’s gold!
Crafting the Creamy Cheese Sauce
In that same skillet (see? Minimal cleanup already!), melt the butter over medium heat. Sprinkle in the flour and whisk it like crazy for about a minute. This makes a roux, which is what thickens our sauce. Slowly pour in the milk and then the half-and-half, whisking constantly. Keep whisking until the sauce thickens up beautifully – usually just about 2 minutes. Now for the good stuff: stir in the salt, pepper, and that little pinch of cayenne. Then, add the cheese and stir until it’s all melty and glorious. If it seems a smidge too thick, just add a splash of chicken broth to get it to a perfect pourable consistency. Turn off the heat for now!
Assembling and Baking Your One-Pan Thanksgiving Green Beans
Okay, almost there! Add your drained pimientos and that amazing bacon-onion mixture into your creamy cheese sauce. Give it a good stir to combine all those fantastic flavors. Now, gently fold your blanched green beans into the sauce. Pour this whole glorious mixture into your baking dish. Sprinkle the panko breadcrumbs evenly over the top. Pop it into a preheated oven at 350°F (175°C) and bake for about 30 minutes. You’re looking for a bubbly sauce and that lovely golden-brown crunch on top. It smells divine!

Tips for Success with Your One-Pan Thanksgiving Green Beans
I’ve made this dish more times than I can count, especially around the holidays, and I’ve picked up a few tricks to make sure it turns out perfectly every single time. You know how sometimes a recipe just *works*? Well, these little tips are my secret sauce (pun intended!) to making sure these green beans are always a hit.
First, don’t skimp on the fresh green beans! While you *can* use frozen in a pinch, the texture just isn’t the same. Fresh ones give you that perfect snap. And when you’re grating that cheese, really grate it yourself. Pre-shredded cheese has anti-caking agents that can make your sauce a little less smooth and creamy. Also, that brief blanching step is super important – don’t skip it! It makes sure your beans are tender without getting mushy in the oven. It’s these little details that really make a difference. If you want to know more about my cooking philosophy, check out my about page – it’s all about making delicious food accessible!
Make-Ahead and Storage for One-Pan Thanksgiving Green Beans
The best part about this recipe, besides the minimal cleanup? It’s totally make-ahead friendly! Seriously, it’s a holiday miracle. You can totally blanch your green beans and even make the sauce (up to the point of adding the beans) a day or two in advance. Just store them separately in airtight containers in the fridge. When you’re ready, combine everything in your baking dish, top with those panko crumbs, and bake. It might need an extra few minutes in the oven since it’s starting cold. As for leftovers? They’re delicious! Store them in an airtight container in the fridge for up to 3-4 days. To reheat, I like to pop them in a moderate oven (around 300°F) until warmed through, or gently warm them on the stovetop over low heat. Avoid microwaving if you can, as it can sometimes make the beans a little soft.
Frequently Asked Questions About One-Pan Thanksgiving Green Beans
Got questions? I’ve got answers! Trying out a new recipe, especially for a big holiday like Thanksgiving, can bring up a few things. Here are some common questions I get about these super easy green beans:
Can I use frozen green beans instead of fresh?
You totally can, and it’s a great shortcut! Just make sure you thaw them completely and drain them really, really well before adding them to the sauce. You might need to cook them for a few minutes less in the oven since they’ll release more moisture. They won’t have quite the same *snap* as fresh, but they’ll still be delicious!
What can I substitute for the crispy onions on top?
While panko breadcrumbs give us that lovely crunch and are super easy, sometimes people want something different, or maybe they just don’t have them on hand. You could use regular breadcrumbs, or even some crushed seasoned crackers or fried shallots if you have those. A sprinkle of toasted slivered almonds also adds a nice touch and flavor!
How do I make this green bean casserole dairy-free?
Oh, that’s a great question for folks with dairy needs! To make it dairy-free, you’d swap out the butter for a plant-based butter alternative, use a dairy-free milk like almond or soy, and find a good dairy-free cheddar cheese alternative. You’d also skip the half-and-half and maybe use a bit more of your dairy-free milk or a splash of unsweetened dairy-free creamer. It can be done!
Can I make the sauce ahead of time?
Absolutely! The sauce is probably the best part to make ahead. You can whip up the sauce (steps 2 and 3) a day or two in advance and store it in an airtight container in the fridge. When you’re ready to bake, gently warm the sauce, then fold in the blanched green beans and proceed with baking. It’s a great way to save time and stress on Thanksgiving Day! For more tips on making dishes ahead, you can check out my sample page, which sometimes has useful make-ahead advice!
Estimated Nutritional Information
Please keep in mind that these are just estimates, folks! The exact nutritional values can change depending on the specific brands of ingredients you use and how much of everything you end up eating (no judgment here!). This is a general idea per serving for our delicious One-Pan Thanksgiving Green Beans:
- Calories: Around 350-400
- Fat: Roughly 25-30g
- Protein: About 10-15g
- Carbohydrates: Approximately 15-20g
- Sodium: Varies quite a bit, but aim for quality ingredients to keep it reasonable!
Share Your One-Pan Thanksgiving Green Beans Experience!
I’d absolutely LOVE to hear how your One-Pan Thanksgiving Green Beans turned out! Did you try any fun variations? Did your family devour them? Please leave a comment below, rate the recipe, or snap a pic and tag me on social media! You can even reach out through my contact page if you have any questions. Sharing your cooking adventures makes my day!

One-Pan Thanksgiving Green Beans (Minimal Cleanup)
Ingredients
Equipment
Method
- Blanch the green beans: Drop them into lightly salted boiling water and cook for 3 to 4 minutes. Remove the beans with a slotted spoon and immediately plunge them into ice cold water to stop the cooking. Drain the beans once cool; set aside.
- Add the bacon pieces to a skillet over medium heat. Cook for 2 minutes, then add the onion and garlic. Continue cooking for 3 to 5 minutes, or until bacon is done (but not crisp) and the onion is golden brown. Remove from heat and set aside.
- In a separate skillet or saucepan, melt the butter over medium heat. Sprinkle in the flour and whisk to combine. Cook for 1 to 2 minutes, then add the milk and half-and-half. Cook, whisking constantly, until the sauce thickens, about 2 minutes. Add the salt, pepper, and cayenne, then add the cheese. Stir until the cheese melts. If the sauce is too thick, add chicken broth as needed. Turn off the heat.
- Add the pimientos and the bacon/onion mixture to the sauce. Stir to combine. Pour the sauce over the green beans and stir gently. Pour everything into a baking dish and top with panko breadcrumbs. Bake at 350°F for 30 minutes, or until the sauce is bubbly and the panko is golden.
Notes
Tried this recipe?
Let us know how it was!
Urban Forager & Hyperlocal Ingredient Specialist
My Brooklyn apartment balcony tells my story: vertical gardens packed with wild edibles, fermentation crocks bubbling with city-foraged greens, and the constant hum of dehydrators preserving herbs I’ve collected from unexpected urban corners. What started as weekend escapes to my aunt’s upstate farm during my Columbia botany studies turned into something bigger after I earned my Urban Ecology Master’s from The New School.
Instead of following traditional academic paths, I discovered that cities are actually amazing edible ecosystems—rooftop weeds, park-edge wild greens, vacant lot treasures that perfectly complement keto eating. Who knew that some of the best low-carb foods were growing right under our noses in Manhattan?
My recipe collections celebrate city seasons: spring dandelions and plantains, summer purslane from rooftops, autumn rose hips from community gardens, winter wild onions and cress. I’m certified through the New York Mycological Society and trained by Brooklyn Botanic Garden to forage safely and ethically. Over 180 of my recipes feature at least one urban-foraged ingredient—from sidewalk plantains to sumac berries and wild mint thriving in vacant lots.
My “Metropolitan Wild” column went viral after my dandelion coffee substitute hit social media. Now my weekend “Urban Wild Walks” through Central Park and Prospect Park sell out faster than I can schedule them. I teach city dwellers to spot safe, keto-friendly wild foods hiding in plain sight.
Currently, I’m partnering with local chefs to bring urban foraged elements to restaurant menus and developing an app that maps safe foraging spots across all five boroughs. Evenings find me tending my sourdough starters, pressing flowers for natural dyes, or weaving baskets from willow branches I collect during park maintenance.
Cities are wild food sanctuaries hiding in plain sight—keto eating becomes urban rebellion when you realize how much free, perfect nutrition grows right under our feet.