
There’s just something about holiday dinners that demands a showstopper, right? It needs to smell incredible, look stunning on the table, and frankly, it needs to melt in your mouth. For years, I thought that kind of perfect texture—that melting tenderness—was only achievable behind the swinging doors of a fancy restaurant.
I’ll never forget the first time I attempted to make a prime rib for a gathering. I was totally inspired by memories of my grandmother’s lavish dinners, where the table would be adorned with beautiful plates and, of course, that sumptuous roast that just dissolved when you cut into it. Standing there in my little Brooklyn kitchen, my heart was racing with sheer excitement mixed with this genuine fear of messing up expectations for my family.
But wow, the aroma that filled my small apartment—it was rich and warm immediately. When I finally put that roast down, watching everyone savor every bite and smile as they remembered Grandma’s feasts, it was magic. It proved to me that restaurant-quality dishes aren’t out of reach. With the right approach, like this method for creating your own Boneless Prime Rib — Restaurant-Quality at Home, we can absolutely capture those moments of joy right here in our own kitchens. I’m Alexandra Bennet, and trust me, you can do this!
Why This Boneless Prime Rib — Restaurant-Quality at Home Method Works
You might think that making a show-stopping Holiday Roast takes a ton of fancy equipment or complicated steps, but honestly, this method is all about smart technique with surprisingly Minimal Prep. We aren’t fussing around! This secret weapon is the combination of ultra-low cooking followed by that final blast of heat.
It guarantees two things every single time:
- The inside is perfectly rosy from edge to edge, just like you ordered it downtown.
- You get that incredible, salty, herb-crusted bark that makes your whole house smell amazing.
Check out the recipe at our collection of favorite recipes if you want more ideas after this masterpiece!
Achieving Perfect Doneness Every Time
The real move here is the 275F oven. Seriously, it sounds crazy low, but that gentle heat cooks the entire roast evenly. Think of it like a spa day for your beef! Because we cook it so slowly, your meat thermometer becomes your best friend. You pull it out just before it hits the perfect temperature because of carryover cooking—that residual heat will still bump it up 5 to 10 degrees while it rests. That’s how you avoid pink-to-gray gradient, which is such a classic home-roast mistake!
The Secret to a Flavorful Boneless Prime Rib — Restaurant-Quality at Home Crust
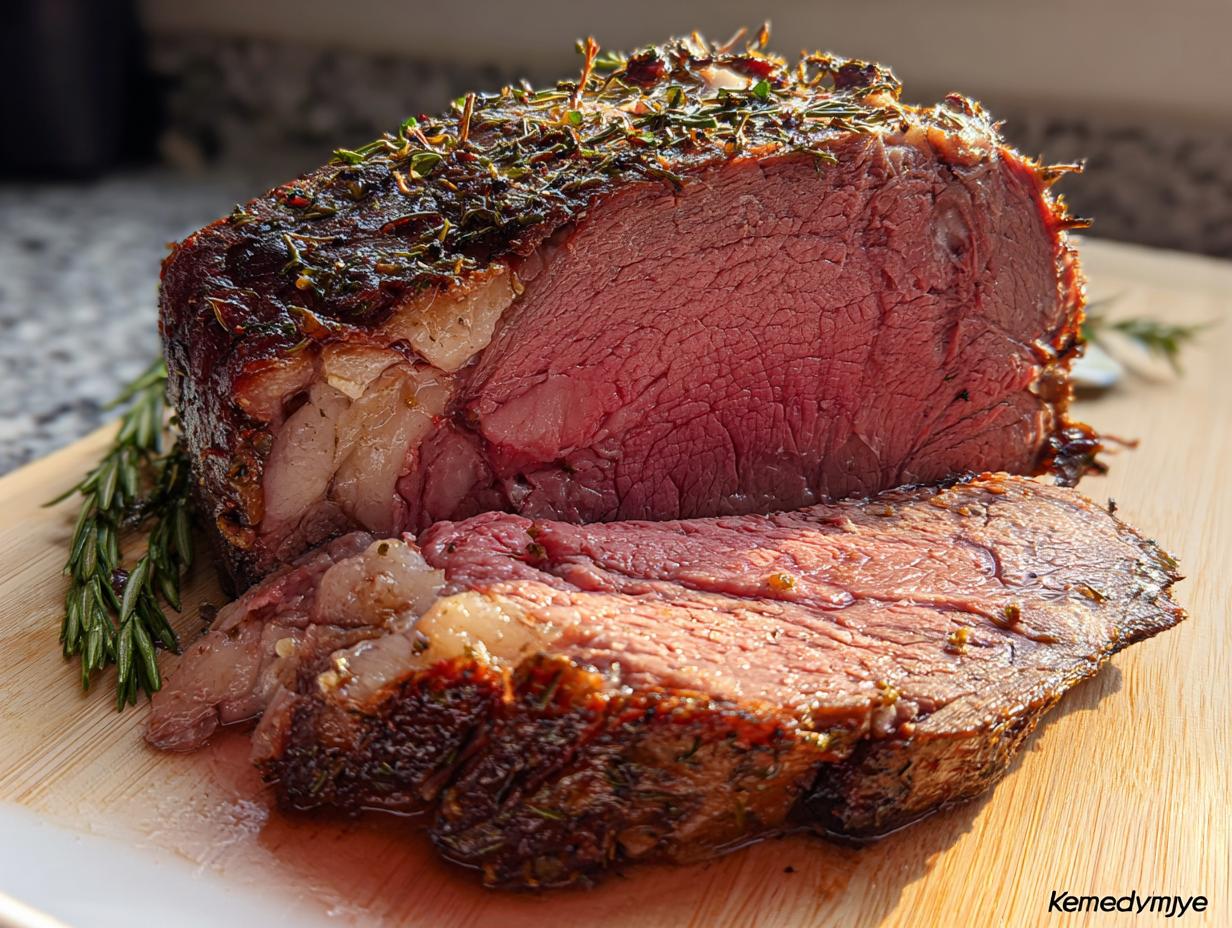
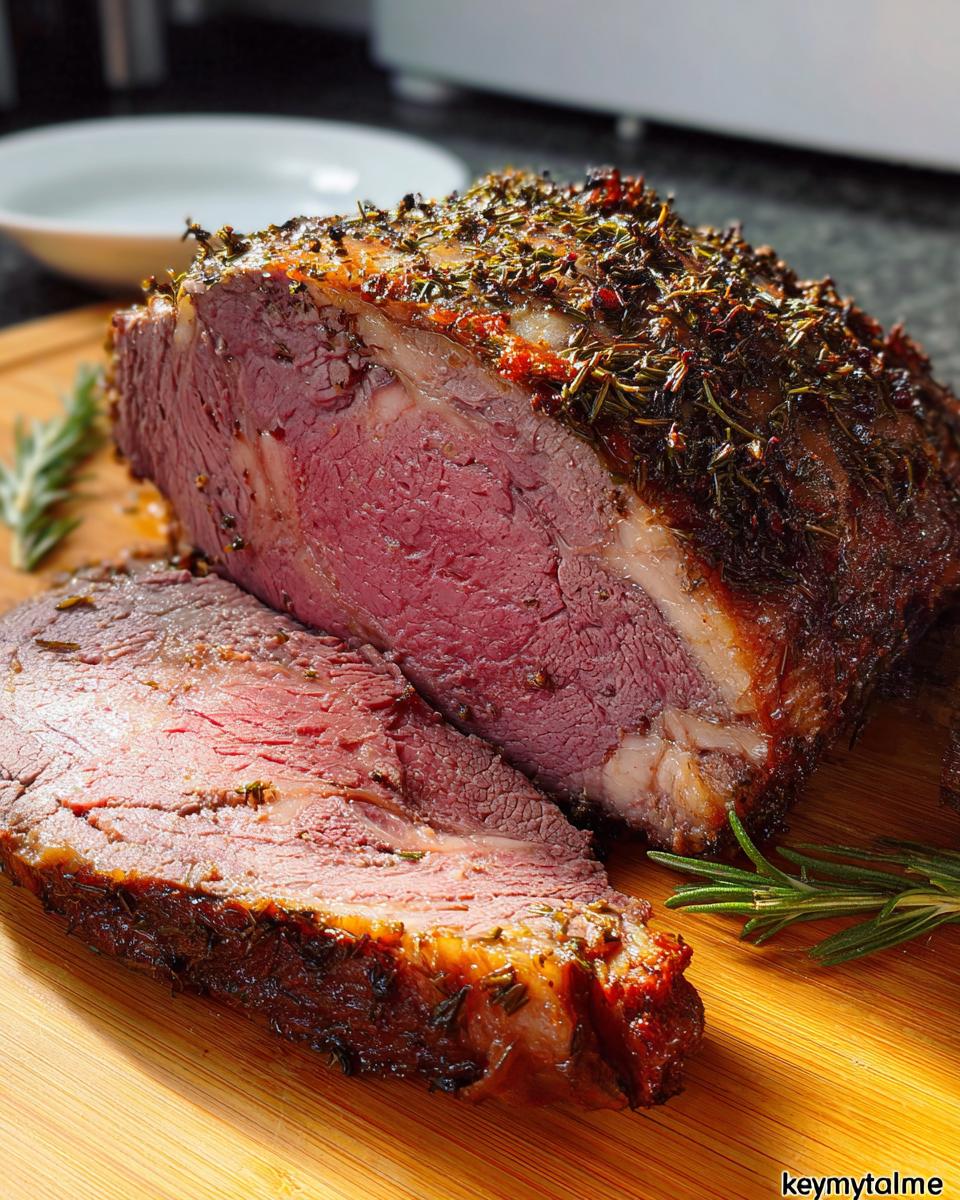
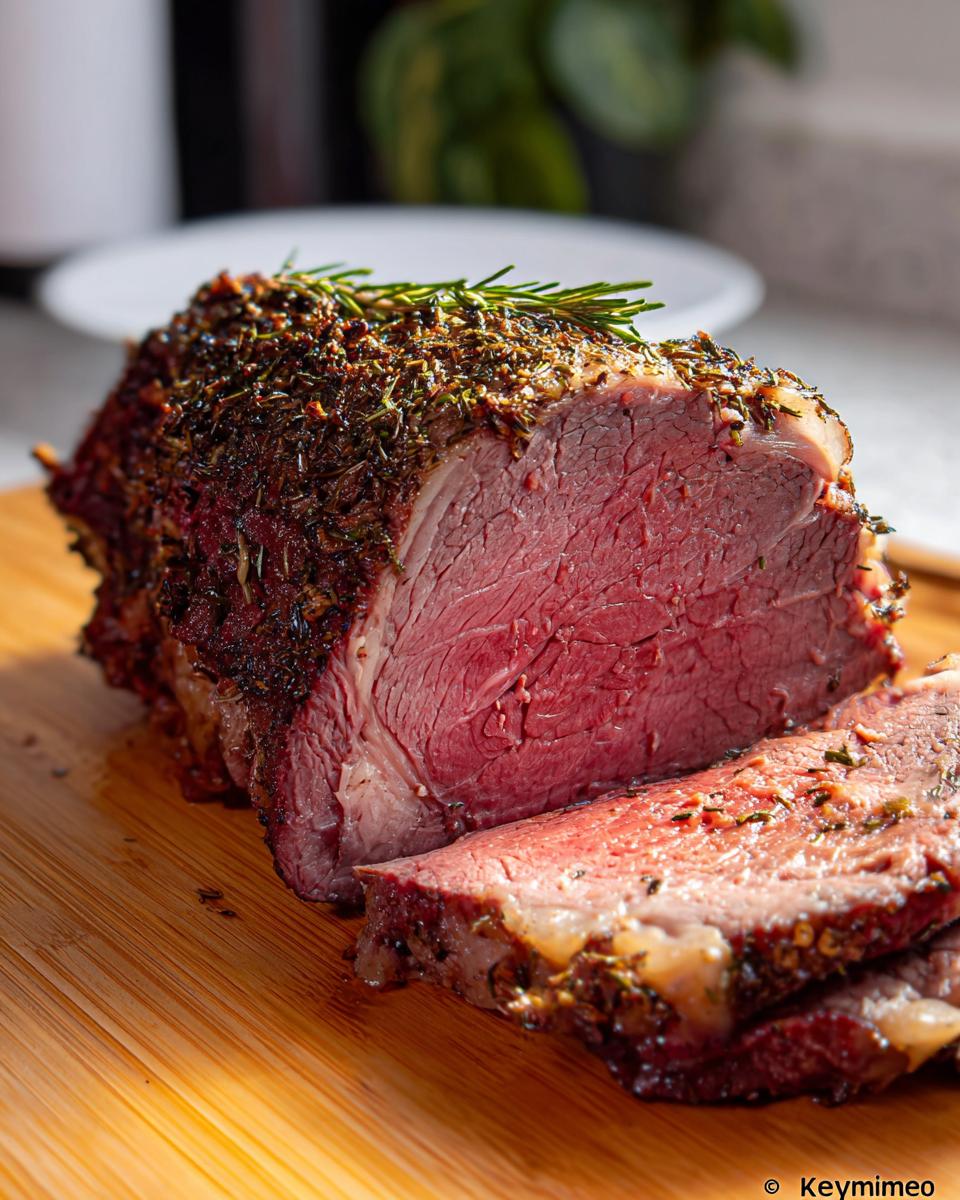
You know that amazing crust you get at a steakhouse? We aren’t just relying on the dry rub for that. We use a two-stage firing system! First, the low-and-slow method gently cooks the inside while drying the surface slightly. Then, right at the end, we crank the oven up to 450F. That intense heat hits the surface and quickly caramelizes all that salt and those herbs you rubbed in earlier. That quick sear is non-negotiable for achieving true Boneless Prime Rib — Restaurant-Quality at Home flavor.
Essential Ingredients for Boneless Prime Rib — Restaurant-Quality at Home
Okay, here’s where we get down to brass tacks. The beauty of this Boneless Prime Rib — Restaurant-Quality at Home recipe is that it relies on fantastic meat and a straightforward, powerful spice blend. You don’t need five different fancy oils or hard-to-find rubs!
We are focusing on classic flavors: rosemary, thyme, and a generous layer of salt. Before you even start mixing, take a peek at our favorite balanced supper ideas; it gives you an idea of how simple ingredients can make a huge impact.
Making sure you have good quality stuff matters here—it’s the foundation for that professional flavor you’re after. I even sneak a peek at Key to My Lime’s recipe sometimes just for a visual check before I start prepping!
For the Spice Rub: Best Seasonings For Boneless Prime Rib
This rub is key for that deep crust flavor. Make sure you use freshly ground pepper; it really wakes up the flavor profile compared to the pre-ground dusty stuff. It makes such a difference when you’re aiming for that professional touch!
- 6 pounds boneless prime rib roast (if yours is larger, double the spice blend!)
- 1 Tablespoon kosher salt (sprinkle from 6 inches above—this helps distribute it evenly!)
- 2 teaspoons dried rosemary (Tip: When you mix this, use your fingers to really crush and break up the rosemary leaves. It releases way more fragrant oils!)
- 1.5 teaspoons dried thyme leaves
- 1.5 teaspoons coarse black pepper (freshly ground is best)
- 1.5 teaspoons garlic powder
- 0.5 teaspoon paprika
For Cooking
These are what keep the meat from scorching on the bottom and add a little steam/flavor magic while it cooks slowly.
- 1 cup beef broth (or water works in a pinch!)
- Vegetables for roasting (optional) (cut and mixed with oil, salt, and pepper—put them in the pan around the roast, not directly underneath it!)
How To Make Restaurant-Quality Prime Rib: Step-by-Step Instructions
Now that we have our amazing spices mixed and our roast sitting pretty, it’s time for the hands-on part. Don’t be intimidated by the long rest time; that’s actually the secret to making your day-of cooking so easy! You mostly just have to let our magic happen overnight while you sleep. This method is structured to prevent stress and maximize flavor, making hosting a breeze.
Preparation and Flavor Building for Your Boneless Prime Rib — Restaurant-Quality at Home
First things first: dry, dry, dry! Grab those paper towels and blot every drop of moisture off that beautiful chunk of meat. Moisture is the enemy of that crispy crust we want. Once it’s bone dry, go heavy with that kosher salt—sprinkle it high so it catches evenly across the surface. Then, rub that herb blend right into the meat. We are packing flavor in here!
Now for the Make Ahead Plan that saves your holiday sanity: wrap that baby up tight, twice, in plastic wrap. It goes straight into the fridge for at least an hour, but trust me, wrapping it for 12 to 24 hours is what brings out that deep, savory flavor. It’s a dry brine working its magic!
Cooking Techniques For Prime Rib: Low and Slow Cooking
When it’s time for the oven, pull the roast out about 30 minutes before you want to cook—it shouldn’t be ice-cold. Preheat the oven to a chilly 275F. You need a roasting pan with a trivet—that’s crucial because we want air circulating underneath. Pop the roast fat-side up on the trivet and pour that beef broth into the bottom of the pan. This creates steam and keeps the drippings from scorching instantly.
Insert your thermometer right into the thickest part, avoiding any major fat pockets. We are cooking this low and slow until it hits 125F internally for medium-rare. This might take around 2 hours and 25 minutes for a standard size, but you have to watch that thermometer!
The Final Sear for the Ultimate Boneless Prime Rib — Restaurant-Quality at Home
This is the grand finale that delivers on the promise of Boneless Prime Rib — Restaurant-Quality at Home! Once it hits 125F, take it out. Tent it loosely with foil and just let it chill out for a good 15 to 20 minutes. It has to rest! While it rests, crank that oven way up to 450F. I feel like I’m running a fancy steakhouse kitchen when I do this!
Once the oven is screaming hot, you pull the foil off, take the thermometer out, and pop that roast back in for just 5 to 8 minutes. That quick, intense heat instantly browns that salty herb crust into something glorious and crunchy. It’s non-negotiable for that perfect sear. You’ll find more great oven tips at our guide to mastering tricky cooking times!
Tips for Serving Prime Rib For A Crowd
Successfully pulling off a huge Holiday Roast like this for a crowd means timing the final cuts perfectly. The worst thing you can do after all that precise cooking is rush the resting, or worse, slice it incorrectly!
Remember that first time I made it? I was so worried everyone would be hungry that I skipped the resting time entirely. I sliced into it right away, and honestly, the juices just streamed right out onto the cutting board, leaving the meat looking a little dry, even though it tasted okay. That was a rookie mistake I swore I’d never repeat!
Now, I treat that 15 to 20-minute rest like it’s sacred. It lets those juices redistribute deep into the muscle fibers, which is what guarantees you that incredible, tender slice every single time. Trust me on this one—it’s worth the extra wait!
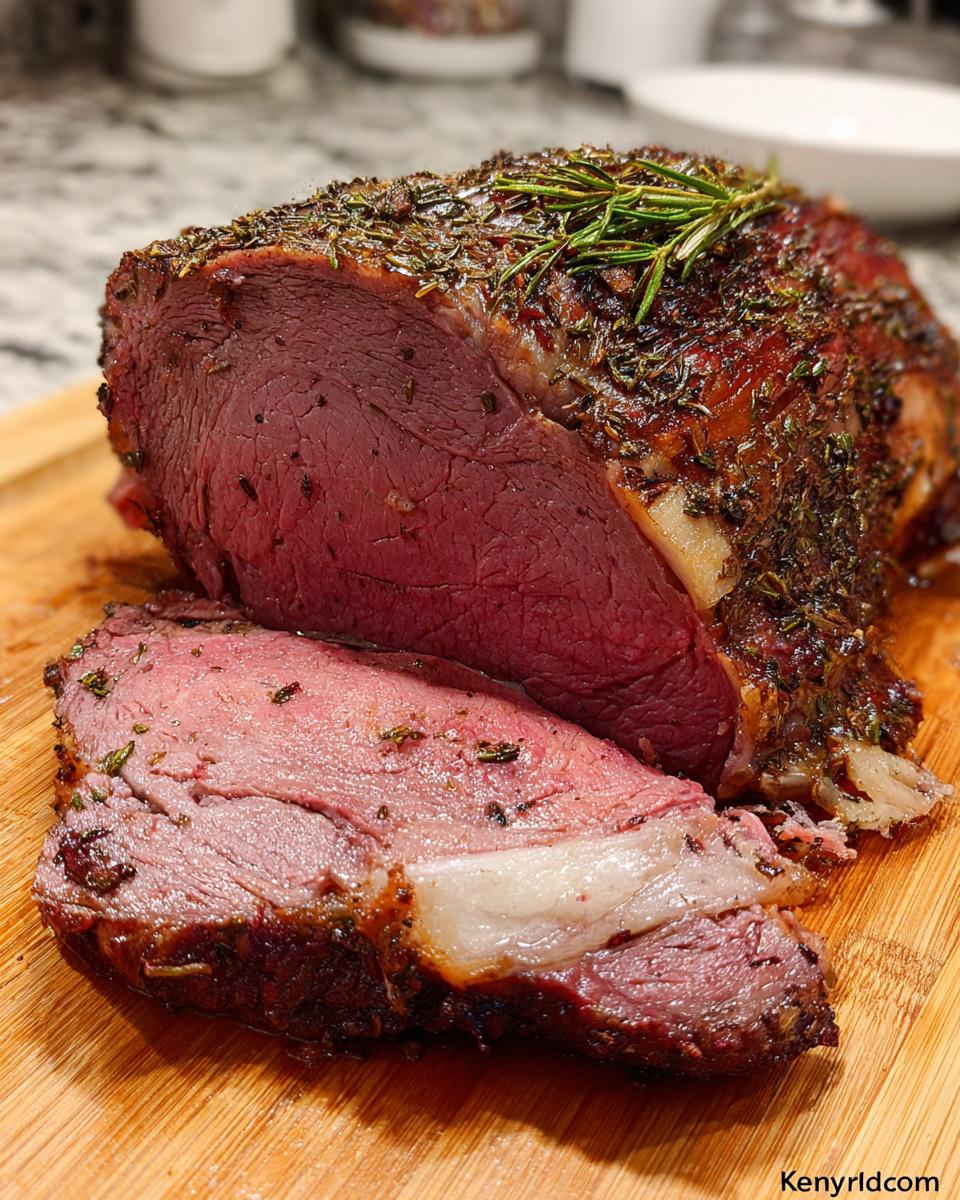
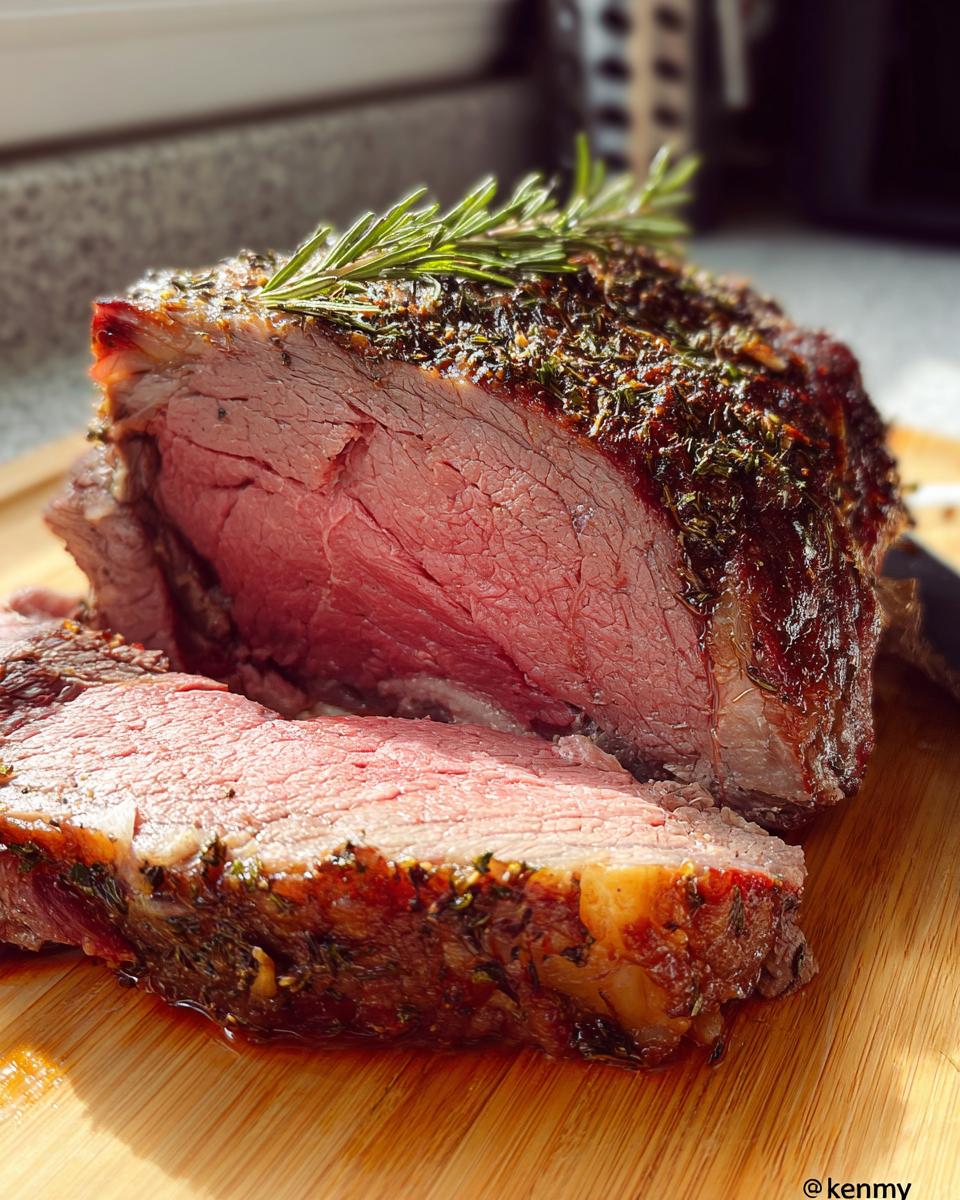
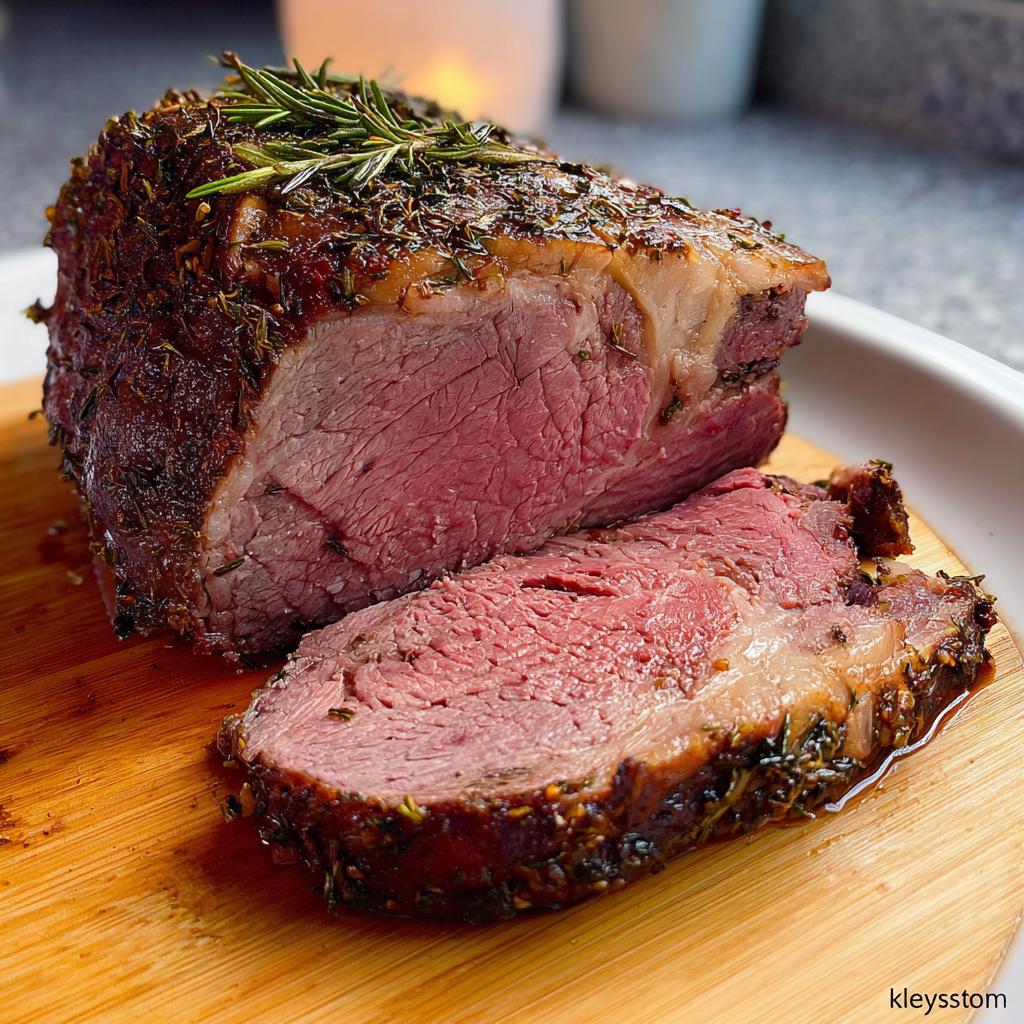
When it comes to slicing, you must always cut against the grain, which means slicing perpendicular to the lines you see running through the meat. For a boneless roast, these lines can sometimes wander a little, so just look closely at the direction the muscle fibers are running. Slicing correctly shortens those fibers, making the meat tender when chewed. For a crowd, aim for slices about a quarter-inch thick. If you want to see some great recipe pairings to go with your roast, check out my creamy Tuscan chicken recipe!
Troubleshooting Common Issues with Boneless Prime Rib — Restaurant-Quality at Home
Even with the best plan, sometimes things go a little sideways in the oven, especially when you’re dealing with a huge piece of meat. Don’t panic if your roast doesn’t look exactly like the picture on day one! We can fix almost anything with a little knowledge about temperature and airflow. I’ve definitely learned a few tricks the hard way so you don’t have to!
If you’re nervous about messing up that expensive cut, I’ve got a couple of go-to fixes for the most common problems people run into when aiming for that true Boneless Prime Rib — Restaurant-Quality at Home.
Unevenly Cooked Roast: Addressing Hot Spots
This is usually a circulation problem, not a recipe problem. If you notice one end of your roast is creeping up to medium-well while the other end is still shy of medium-rare, it means heat isn’t hitting that roast evenly. The fix is simple: make sure you are using a wire trivet—seriously, this lifts the meat off preventing that soggy, overcooked bottom layer. Also, check your pan! If you use a roasting pan that’s too deep or doesn’t leave much space around the roast, the sides can cook faster than the top.
If you notice this happening halfway through, carefully rotate the entire roasting pan 180 degrees. A great companion recipe that deals with precision cooking is my favorite garlic mushroom chicken—it uses similar temperature-watching techniques!
My Crust Didn’t Brown Enough During the Sear
Ah, the letdown when you pull the roast out and the crust is just… pale. This happens almost exclusively because you tried to sear too early! Remember, the second stage requires the oven to be blazing hot at 450F. If you put the roast back in when the oven is only 350F because you got impatient, you’re just going to steam the meat rather than crisping that gorgeous spice rub.
The rule is: Once the roast is resting and tented, you must let that oven preheat fully to 450F. Give it a solid 10 minutes after it signals it’s ready just to be sure. That high, dry heat slams the surface and creates that beautiful, savory bark we associate with How To Make Restaurant-Quality Prime Rib. If your crust is weak, it means the heat wasn’t strong enough for the final blast!
Make Ahead Plan for Your Boneless Prime Rib — Restaurant-Quality at Home
You know what’s the absolute best part of this whole process? The fact that you can conquer the hardest, most important step a day before your big dinner! That overnight refrigeration is my number one secret weapon—it’s the ultimate Make Ahead Plan, and it’s what truly separates a good roast from an incredible one.
The instructions say to wrap that seasoned roast up tight and stick it in the fridge for at least an hour, but honestly, don’t cheat yourself. When I’m planning a big meal, that roast goes in the fridge the day before, sometimes even two days out! This process is called dry-brining, and it does two magnificent things for your Boneless Prime Rib — Restaurant-Quality at Home.
How Dry Brining Simplifies Your Cooking Day
First, the salt draws out a tiny bit of moisture from the surface, and then that salty moisture gets reabsorbed deep into the meat. This means the inside is seasoned perfectly all the way through, not just on the outside where the rub sits. It’s incredibly efficient!
Second, when you pull that cold roast out right before putting it in the low oven, the surface is already super dry. Remember how we talked about moisture being the enemy of the crust? A dry surface sears beautifully when we crank the heat up, giving you that perfect exterior bark much faster and easier. It really cuts down on last-minute kitchen stress!
Flavor Improvement Over Time
If you have the time, let it sit longer! Seriously, the flavor components in the rosemary and thyme get a chance to actually penetrate the meat when it sits overnight in that cold environment. It’s not just salt seasoning; it’s deep infusion. Think of it like letting a great stew simmer on the stove for hours—the longer it sits, the more complex the flavor becomes.
If you’re looking for other meals that benefit from a good chill time, check out my recipe for freezer-friendly pumpkin waffles; those taste even better the next day, too! Mastering the wait time is just part of making food that tastes like it came from a top-tier, professional kitchen.
Storage & Reheating Instructions for Leftover Boneless Prime Rib
If you manage to have leftovers—which, in my family, is a minor miracle—you absolutely must handle them correctly! We’ve gone to all this trouble to get that rich, buttery texture, and we certainly don’t want to ruin it by microwaving it into shoe leather the next day. Leftover prime rib can be just as amazing as the first serving if you treat it kindly.
The key here is moisture retention. You want to bring that savory, perfect meat back to life without drying it out again. When it comes to managing those delicious bits, I always rely on a few simple methods that keep the flavor profile intact.
Best Practices for Storing Your Roast
Don’t just toss the leftovers in a random container. Slices need to be protected! Once the roast has cooled completely (I mean truly cool, not even warm), slice what you plan to eat over the next couple of days. Wrap those individual slices incredibly tightly in plastic wrap—think two or three layers to keep the air completely out. Then, you can place those wrapped slices into a zip-top bag or an airtight container.
This beef is rich, so you don’t need a lot of it. It stores perfectly well in the fridge for about four days. If you have a ton left over, freezing is always an option, but make sure you label and date those packages immediately! You can freeze slices for up to three months this way, though I rarely have leftovers that long.
Reheating for Perfection
Forget the microwave unless you are in a desperate rush for a sandwich—and even then, slice it paper-thin first! For true quality reheating, we need gentle heat and moisture.
My go-to method is treating it like a mini-roast again. Slice the leftover prime rib about 1/4 inch thick. Grab a shallow oven-safe pan (the ones we used for the initial roast work great!) and pour just a tiny bit of beef broth or even some saved Au Jus into the bottom—just enough to cover the bottom of the pan, not submerging the meat.
Set your oven very low, say 250F. Lay the slices in a single layer in the broth, cover the pan tightly with aluminum foil, and let it warm up slowly. It usually only takes about 15 to 20 minutes. The broth creates this lovely steamy environment that keeps the meat juicy while it warms through without cooking it further. It’s a dream!
If you are making amazing sandwiches later, slice the beef super thin and place it on a roll. You can dip the whole sandwich into extra hot broth (a French Dip style!) right before serving. For instant air fryer crispiness on a smaller batch, check out my recipe for air fryer crispy coconut shrimp—it proves that reheating methods can really salvage texture!
Estimated Nutritional Information for Boneless Prime Rib — Restaurant-Quality at Home
Okay, let’s talk numbers! I know when you’re making something this decadent for a celebration, you’re probably not thinking about macros, but I always like to include a general idea of what’s in this incredible Boneless Prime Rib — Restaurant-Quality at Home feast we just created.
Please remember these figures are just ballpark estimates. I’m basing this on the 6-pound roast size and assuming you’re trimming a decent amount of visible fat during carving—because we all know the fat content can swing wildly depending on how well you butcher it!
I always look at the less-glamourous details, kind of like how I look at saving money on groceries; you can see how we break down cheap meals over at my guide to money-saving keto meals!
But for those keeping track, here is what the numbers roughly look like per serving (based on 10 servings):
- Calories: 361
- Protein: 48.8g
- Fat: 16.3g
- Carbohydrates: 4.1g
- Fiber: 0.3g
- Sugar: 0g
This looks pretty fantastic for such a rich meal, right? You’re getting tons of protein from that gorgeous beef! My disclaimer is simple: Since this is a high-fat, high-protein roast, the exact calorie and fat counts will really change based on how much you trim off before serving. But either way, it’s worth every rich, savory bite!
Share Your Success Making Boneless Prime Rib — Restaurant-Quality at Home
Okay, I’ve shared all my grandma’s secrets and my own hard-won kitchen wisdom, and now it’s your turn! Tell me how it went. Did you achieve that perfect medium-rare center? Did your family rave about the crust?
Please drop a comment below—I read every single one! Rate this recipe for the next baker, and if you snapped a gorgeous picture of your Boneless Prime Rib — Restaurant-Quality at Home, tag me on social media. You can always reach out via my contact page if you have any burning questions. Happy roasting!
Boneless Prime Rib — Restaurant-Quality at Home
Ingredients
Equipment
Method
- Dry the prime rib thoroughly with paper towels on all sides.
- Sprinkle the kosher salt evenly over all sides of the prime rib from about 6 inches above.
- In a small bowl, combine rosemary, thyme, pepper, and paprika. Stir and break up the rosemary. Evenly sprinkle the rub over the prime rib, massaging it into the meat.
- Tightly wrap the prime rib twice in plastic wrap. Place on a plate and refrigerate overnight, or for at least 1 hour (preferably 6-24 hours).
- About 30 minutes before cooking, preheat your oven to 275F. Remove the roast from the refrigerator and unwrap it.
- Place a wire trivet in a cast iron skillet, roasting pan, or shallow oven-safe pan. Place the roast, fat side up, in the center of the trivet.
- Pour the beef broth into the bottom of the pan, avoiding the meat. If using vegetables, place them around the roast.
- Insert an oven-safe meat thermometer into the center of the roast, ensuring it does not touch fat.
- Place the roast in the preheated oven. Cook for approximately 2 hours and 25 minutes (24-27 minutes per pound) until the internal temperature reaches 125F for medium-rare.
- Begin checking the temperature after about 2 hours, monitoring every 10-15 minutes until the desired internal temperature is reached. Remember the temperature will rise 5-10 degrees while resting.
- Carefully remove the roast from the oven. Tent the pan with aluminum foil. Turn the oven up to 450F.
- Let the roast rest for 15-20 minutes, or until the internal temperature reaches 130-135F. Allow the oven to preheat to 450F during this time.
- Remove the foil and thermometer. Return the roast to the hot oven for 5-8 minutes to sear until the crust is brown and crispy.
- Carefully remove the roast from the oven. Transfer the prime rib to a cutting board and vegetables to a serving dish. Save drippings for Au Jus.
- Slice the roast against the grain with a sharp knife. Garnish with fresh rosemary and serve with desired sides and Au Jus.
Nutrition
Notes
Tried this recipe?
Let us know how it was!
Urban Forager & Hyperlocal Ingredient Specialist
My Brooklyn apartment balcony tells my story: vertical gardens packed with wild edibles, fermentation crocks bubbling with city-foraged greens, and the constant hum of dehydrators preserving herbs I’ve collected from unexpected urban corners. What started as weekend escapes to my aunt’s upstate farm during my Columbia botany studies turned into something bigger after I earned my Urban Ecology Master’s from The New School.
Instead of following traditional academic paths, I discovered that cities are actually amazing edible ecosystems—rooftop weeds, park-edge wild greens, vacant lot treasures that perfectly complement keto eating. Who knew that some of the best low-carb foods were growing right under our noses in Manhattan?
My recipe collections celebrate city seasons: spring dandelions and plantains, summer purslane from rooftops, autumn rose hips from community gardens, winter wild onions and cress. I’m certified through the New York Mycological Society and trained by Brooklyn Botanic Garden to forage safely and ethically. Over 180 of my recipes feature at least one urban-foraged ingredient—from sidewalk plantains to sumac berries and wild mint thriving in vacant lots.
My “Metropolitan Wild” column went viral after my dandelion coffee substitute hit social media. Now my weekend “Urban Wild Walks” through Central Park and Prospect Park sell out faster than I can schedule them. I teach city dwellers to spot safe, keto-friendly wild foods hiding in plain sight.
Currently, I’m partnering with local chefs to bring urban foraged elements to restaurant menus and developing an app that maps safe foraging spots across all five boroughs. Evenings find me tending my sourdough starters, pressing flowers for natural dyes, or weaving baskets from willow branches I collect during park maintenance.
Cities are wild food sanctuaries hiding in plain sight—keto eating becomes urban rebellion when you realize how much free, perfect nutrition grows right under our feet.